Tuesday, November 23, 2010

Celebrate!! With the best dessert ever!


I've got many things to celebrate today! First of all, this is my 100th post! Wow! I remember starting this blog more than 4 years ago, and am amazed that I found so much to write about.

Even more exciting, when I logged on tonight, I discovered I had a new follower! I know 30+ people subscribing to my blog isn't an overwhelming milestone, but it makes me happy. I started writing here so that I could share my experience with others, hopefully making their lives easier. I hope I've been able to do that for all of you. I appreciate your comments and all of your awesome blogs as well! You know I'm more interested in reading than writing, though I do occasionally manage to find something worthwhile to share here. Thanks for sticking around as I've improved on my gluten/dairy-free cooking, blogging and photography skills!

The last thing I want to celebrate today really is the best dessert I think I've had since discovering all my food issues (if not the best dessert I've ever had in my life...). And let me be clear. I love my desserts. And I've made and eaten quite a few good ones. This one, however, takes the cake! Or rather, the cheesecake (I know, I know, groan-worthy. I'm sorry...I had to!)

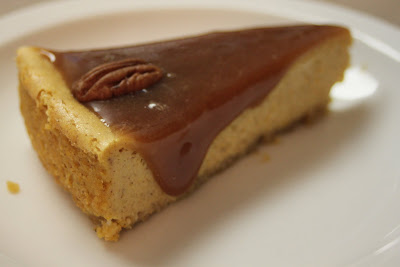
Feast your eyes on this beauty:


Pumpkin cheesecake with a caramel dulce de leche topping. Yep, it's as good as it sounds. When I was debating what to make for my birthday at the beginning of the month, I just kept coming back to this gorgeous photo, and the recipe attached. I took a poll, and this one was the one everyone suggested. So glad I tried it, and so were my friends and family! Even my cheesecake snobs and cheesecake dislikers enjoyed it!

I know this is super late for the Thanksgiving feast. If you've already got something lined up for the big day, I would recommend making it in a couple days, once everyone's had a chance to digest. They will thank you for it.


Pumpkin Cheesecake with Dulce de Leche & Pecans
Gluten & Dairy Free

3/4 c crushed Cinnamon Chex (I used Rice Chex with a sprinkling of cinnamon)
1/2 c finely chopped/ground pecans
2 tbsp white sugar
2 tbsp brown sugar
1/4 c butter substitute, melted (I used Earth Balance spread)

3/4 c white sugar
3/4 c pureed pumpkin (Check out this great post on easy crockpot cooking of your pumpkin, or you can always use the stuff from a can)
3 egg yolks
1 1/2 tsp ground cinnamon
1/2 tsp ground nutmeg
1/2 tsp ground ginger
1/4 tsp salt
3 (8 ounce) packages cream cheese substitute (Tofutti was a winner!)
1/4 c plus 2 tbsp white sugar
1 egg
1 egg yolk
2 tbsp sour cream sub (Tofutti again. Original recipe called for whipped cream)
1 tbsp cornstarch
1 tsp vanilla extract (recipe calls for 1/2 tsp vanilla, 1/2 tsp lemon extract, which I didn't have)
Dulce de Leche (for topping)**
Whole pecans (for topping)


Preheat the oven to 350 degrees F.

Combine first 5 ingredients in a small bowl and mix well. Sprinkle into a 9-inch springform pan, pressing lightly until bottom of pan is covered.

Mix together 3/4 c white sugar, pumpkin, 3 egg yolks, spices and salt in a meidum bowl. Set aside.

Dump the cream cheese into a larger bowl. Beat w/ an electric mixer until light and fluffy (ish. Mine never got that fluffy). Slowly add 1/4 c plus 2 tbsp white sugar, and beat. Add egg, egg yolk, and sour cream; beat well again. Add the corn starch and vanilla. Beat once more until mixture becomes smooth.

Add the pumpkin mixture to the cream cheese mixture and mix well. Pour into the springform pan. Place pan on a cookie sheet lined with foil in case you have any leakage.

Bake cheesecake in the preheated oven for 50-55 minutes. Don't overbake it. The center will firm up when chilled. Once it's done, turn the oven off, and crack open the door. Leave cheesecake in the cooling oven for 1 hour (this helps prevent the top from cracking).

Once cooled, remove from oven. Cover and refridgerate until ready to dig in. Remove the pan siding (I didn't risk taking the cake off the bottom of the springform pan, so not sure how that would work), and decorate cheesecake with dulce de leche and pecans. (Just FYI, the dulce de leche will stick to anything you try and cover the cheesecake with. You may want to keep the pan siding around to place around the cake if you're covering and refridgerating w/ the topping on).

Serve, and enjoy the praise you will be receiving from those you deem worthy to partake with you in this heavenly experience.


**Dulce de Leche done dairy free

I followed this recipe from allrecipes.com, quartering the original measurements. It worked beautifully! This recipe takes about an hour to make (10 min for processing your own almond milk, and about 45 minutes of stirring to get the dulce de leche to the right consistancy). Read the comments below the recipe on allrecipes if you need help w/ making this.

Dairy Free Dulce de Leche

4 cups homemade almond milk (recipe here)
Approx. 1 tsp vanilla extract, or 1/4 vanilla bean
1 c plus 2 tbsp white sugar
1/4 tsp baking soda

In a large saucepan (yes, you do need to use a large one, b/c this stuff foams), bring the milk to a boil over medium-high heat (original recipe calls to strain at this point, but I found this an unncessary step, as there was nothing to strain in here).

Add vanilla, then stir in the sugar. Stir constantly until the sugar is dissolved. Just before the mixture begins to boil, stir in the baking soda.

Turn heat down to medium. Continue to stir constantly for the next 40-50 minutes, until the midxture thickens (grab a good book and a stool so you can sit by the stovetop). I figured mine was done when it resembled a caramel sauce that you would use on ice cream. Not too runny, but not too thick. Takes a minute to come back together when you divide it by running a spoon through it.

Remove from heat, and pour into glass or other heat-proof dish to cool. Once it's cooled a bit on the counter, cover and stick in the fridge to chill before using. Don't use on the cheesecake until the dulce de leche is totally cold.

Makes about 1 1/2 cups (8 servings, supposedly, and just enough to top the cheesecake!).


P.S. Before you dunk that empty, caramely, sticky pan in some water to wash it out, put it back on the stove, add some almond milk, and warm it over med-low heat for a few minutes. Pour into your favorite coffee mug, and enjoy! Makes cleanup that much sweeter :D

P.P.S. This recipe is linked up to Linda @ The Gluten Free Homemaker's Gluten Free Wednesdays event! Check it out!

P.P.P.S. This recipe is also linked up to Amy @ Simply Sugar & Gluten Free's Slightly Indulgent Tuesdays, Diane @ The WHOLE Gang's Holiday Party, where she is giving away some great cookbooks, as well as Alex's The 12 Days of Bloggie-mas @ A Moderate Life.


Saturday, November 13, 2010

Chocolate Pecan Tart


This delicious GF/DF dessert is great year-round, but I especially liked it after our big Thanksgiving feast last year. When planning my menu, I couldn't decide between something chocolatey and something a little more savory. So when I stumbled across this recipe, I got excited! I love pecan pie! And adding chocolate just seems so right! Satisfies both cravings at once. It was the first pie dish to empty at the family get together. Can I say how proud that made me?

Last year I served it up with a can of fake whipped cream. It was good, and made for cute formations atop the pie, but one of the cans malfunctioned, and so I had to throw it away completely unused. There went $5 :( This year, I would recommend this as a less expensive, tastier dairy free whipped cream substitute. Or use the real stuff, if you want to...and no I don't mean the kind from the blue tub! Real whipping cream on Thanksgiving is definitely a worthy cheat in my book :D

I'll start with the pie crust:

Basic Pastry Crust for a Single Pie
Adapted from "1000 Gluten Free Recipes" by Carol Fenster

1/2 c sorghum flour blend*
1/4 + 1/8 c tapioca flour
1/4 c sweet rice flour
1 1/2 tbsp sugar
1/2 tsp xanthan gum
1/2 tsp guar gum (I just used more xanthan)
1/4 tsp salt
1/16 tsp baking soda
1/4 c shortening or buttery spread (I used Spectrum vegetable shortening)
1/4 c milk (I used almond)
1/2 tsp vinegar or lemon juice

Place dry ingredients plus shortening in a food processor. Process until mixture is crumbly. Add milk and vinegar and process again until a ball forms (break up the dough and scrape down the sides with a spatula if it doesn't form a ball, then reprocess).

Remove dough from processor, and knead with wet hands until dough is smooth.

Shape into a disk, 1-inch thick, and wrap with plastic wrap and refrigerate for an hour.

Note: From here, the recipe goes on to describe how to roll the dough out, transfer to a pie plate, and flute the edges. Lol. Those of you who know me know that I don't do that. I just warmed the dough up a bit in my hands, and spread it into a 9-inch non-stick pie pan, pressing with my fingers until it evenly covered the bottom and sides of the pan. Use wet hands if the dough is sticky. It worked great!

Crust is now ready to be filled and baked.


*Carol Fenster's Sorghum Flour Blend:
1 1/2 c sorghum flour (35%)
1 1/2 c potato starch/cornstarch (35%)
1 c tapioca starch (30%)

Add all ingredients to a tupperware. Cover tightly, and shake until blended.
These measurments make about 4 cups. You can also just approximate it, which is what I often do, using the percentages.


Gluten and Dairy Free Chocolate Pecan Tart
Adapted from "1000 Gluten Free Recipes" by Carol Fenster

1 9-inch pie crust, prepared
1 egg, beaten to a foam (I think I skipped the egg wash)
1 c pecans, chopped
2/3 c chocolate chips (I used enjoy life as a DF option)
1/2 c light corn syrup (I can't remember what I subbed for the syrup, I think it was this recipe)
1/4 c packed dark brown sugar
2 large eggs, at room temp
2 tbsp butter/sub, melted
1 tbsp vanilla extract
1/4 tsp salt

Arrange the racks in your oven so that one is in the middle, and one is at the bottom. Preheat oven to 375 degrees F. Brush the edges of the crust with the egg wash. Arrange the pecans on the bottoms of the crust. Sprinkle the chocolate chips on top, spreading evenly.

Make the filling by beating the remaining ingredients in a medium bowl with an electric mixer until blended and smooth.

Slowly pour the mixture into the crust. Place the whole pie pan on a baking sheet. I covered mine with foil for easy cleanup (but I don't think much splashed over).

Bake pie for 10 minutes on the bottom rack of the oven. Move to the middle rack and place a sheet of tinfoil on top of the pie. Bake for an additional 15-20 minutes, or until the filling is set.

Remove from oven and cool pie plate on a wire rack. Once it has cooled completely, refridgerate until ready to serve (at least an hour), so that the filling is firm enough to cut. Serve with whipped cream topping of choice.

Makes 8-12 servings.


What are YOU making for Thanksgiving? I want to hear all about your awesome meal plans!

P.S. I'm so excited to share with you all another amazing dessert recipe! Stay tuned for a very special post :)

P.P.S. This post is part of Linda @ The Gluten Free Homemaker's Gluten Free Wednesdays Carnival! Head over there for other scrumptious recipes!

Thursday, November 11, 2010

Thanksgiving thoughts and a few tips/recipes

Thanksgiving is rapidly approaching.

Two weeks and counting.

Anyone else feeling a bit nervous? I might be. Mostly because I haven't thought it through in my head, and formulated my plan.

The holidays make me sentimental. Sorry. You might have to put up with a bit of my reminiscing.

Holidays are not a big deal in our home, mostly b/c I'm the only one who gets excited about them. My husband could probably care less about Thanksgiving (except for the excess amount of dishes I seem to dirty), and my cat will just run and hide if people come over or I try and put a Santa hat on her. I'm sure once we have kids, this will change.

But I grew up in a holiday home. We all got really into the holidays. My mom is obsessed with Halloween. And Christmas! We had our Christmas tree up by Thanksgiving weekend, and it often stayed there until Valentine's Day.

Growing up, we didn't have any family in town, so we found our own to spend the holidays with. My "adopted" grandparents, Jane and Jonathan, always had a glorious feast ready when we came over for holiday events...as well as the latest season of Star Trek on a VHS. I remember falling asleep at my dad's feet as the post-turkey coma overtook me, incorporating Captain Jean-Luc Picard's monologues into my dreams.

My grandma Jane really knew how to throw a party! There were usually 15-30 people at our holiday dinners, and she made sure there was enough food that everyone got leftovers :) Johnny would carve the meat, and my sister and I usually got saddled with the responsibility of setting the table, or keeping the cats away from the turkey. The only thing we didn't like about Thanksgiving dinner was the "weed" salad, which my mom made us eat. There were things like spinach, red lettuce, kale and DANDELIONS in it. So funny that I totally eat all those things now!


New to the allergy-free holiday zone? Check out this article, which features Karina from The Gluten Free Goddess. It has some great tips on how to host for people with food avoidances, as well as how to approach a host for a party you're going to.

Once you get a plan in place, braving the holidays isn't too daunting. Being prepared is the key. Always having more than enough food, so you don't go hungry while everyone around you is gorging. And overcoming your fears (like learning to make gravy! It's so easy! And I used to be terrified of it!!!).

Around here, I've got a pretty good routine down. We're usually invited to my husband's family shindig, hosted by an aunt or grandma. They all understand my dietary needs, however, since I have such a long list of things to avoid, I have learned it's easier for everyone involved if I just bring my own basics.

So, usually the day before Thanksgiving (or the frantic morning of), I'll make myself a turkey, some sides like stuffing, potatoes, rolls, and lots of gravy. I pack up a plate for myself, and will usually bring some fantastic-looking dessert to share with everyone.

When we get there, I'm given the lowdown on what's safe for me to eat, and will join everyone in munching on veggies, cranberry sauce, deviled eggs, and such until dinner is ready. Then when everyone is gathering around the table, I just throw my plate in the microwave, and dig in! I've learned what I need to have at a family dinner to not feel left out, so I make sure and have extra meat and gravy, rolls, and something chocolatey :)


Check it out!! I've found a great potato-free alternative to the omnipresent spuds that accompany most holiday dinners. Mashed parsnips! I was a skeptic, I'll admit. I've tried undercooked parsnips, and the flavor is strong! But, if you actually cook them through, and add the right amount of butter, a little salt, and the perfect plate of meat, this side dish is a miracle to behold!

I don't really have a recipe, so I'll just wing it...

Potato-Free Mashed Parsnips

Boil some water in a pot. Once it's bubbling, add some peeled, chopped parsnips (I don't know how many make a serving, probably one good-sized parsnip per person). Cook until parsnips are very soft. Make sure you don't undercook, or you'll have a helluva time trying to "mash" them!
Once they're cooked, drain the water from the parsnips. Add some butter (or butter sub like earth balance), a splash or two of milk (or almond milk or other sub), and some salt. Using a hand mixer, beat the parsnips in a large bowl, until they resemble, well, mashed potatoes :) Top with a little cheese, additional buttery goodness, or gravy.

Apparently mashed veggies are all the rage. If you're not sensitive to crucifers, and can't find/don't want to try parsnips, you could also check out Elana's mashed cauliflower.


Here are a few of my recipes that have worked well for holiday feasting, or general winter enjoyment:

Bread cubes for stuffing

Pumpkin Soup

Turkey and Wild Rice Soup

Thanksgiving Meal Plan 2008, including links to a lemon cream coffeecake and rolls


And I have apparently not posted my stuffing recipe, but that's okay. It's really easy. I found this recipe, which is almost identical to the one I use. Just use the bread cube recipe above, and you're set!

One last thing: Check out the thanksgiving favorites post here by over at Gluten Free Easily, as well as giveaways of two awesome books!!

Sunday, November 07, 2010

Thanksgiving preview: Roast Turkey with Prosciutto Hazelnut Butter

Thanksgiving is coming up, so I should probably finally post my awesome turkey recipe from LAST year! I guess this is probably more of a post-view than a preview...But, it's so good that I plan on repeating it (I even went out and bought a thyme plant for my kitchen garden!). I figured if anyone else is looking for inspiration, I've definitely got something to share!

Last year for Thanksgiving, I made an amazing meal! I wasn't even jealous that I had to tote around my tupperware at the family dinner. I was that excited to eat my food! I got this recipe from my monthly email from glutenfreeda, a great resource for gluten free recipes! The article highlighted three different turkey preparation methods. Scroll down to the third one. That one's mine.

Isn't that a beautiful-looking bird?


I do have to admit, I am a bit of a wimp when it comes to non-boneless meat. I really have a hard time with all the skin and tendons and stuff. So, to still have the good stuff for making post-Thanksgiving soup, but not have to deal with gizzards and such, I opted for a turkey breast. This one was probably about 6-7 lbs, so I did cut the original recipe in half.

Roast Turkey with Prosciutto Hazelnut Butter
GF/DF

Serves 6

For the butter:

1 1/2 sticks butter (or sub - Earth Balance is great here), at room temp
3 tbsp finely chopped hazelnuts
3/4 tbsp red wine vinegar
1/2 tbsp chopped fresh thyme
1 tsp crushed black peppercorns
1/2 clove garlic, minced
1/4 tsp salt
4-5 oz chopped prosciutto
1 1/2 green onions, chopped

Mix all ingredients in a bowl. Set aside 1/4 cup for gravy, reserving the rest for the turkey.


For the turkey:

One 6-9 pound turkey (or turkey breast)
1/2 onion, halved
1 1/2 cloves garlic, halved
3 sprigs of thyme
1 sprig of tarragon
1/2 tbsp crushed black peppercorns
2 1/2 c chicken broth (GF!)

Preheat the oven to 325 degrees F. Move oven rack to the lowest position.

Rinse turkey, and pat dry. Trim excess fat. Slide your hand between the skin around the breast and legs to loosen. Spread the butter (minus the 1/4 c for the gravy) under the skin, and covering the outside of the bird as well. Sprinkle salt and pepper inside and out of the turkey. Place turkey on the rack of a roasting pan.

Place the onion, garlic, thyme, tarragon and peppercorns inside the bird's cavity. Tuck wings under the body and tie legs together.

Roast turkey for 1 hour uncovered. Add 1 c broth, and cover w/ a foil tent, continuing to roast for 1-2 more hours, or until the internal temp reaches 175. Baste the turkey with pan drippings occasionally.

Remove from oven and transfer to a platter (set aside the pan drippings for the gravy). Tent with foil to keep it warm. Let it set for about 30 minutes.


For the gravy*:

Reserved 1/4 c prosciutto hazelnut butter
3 shallots (I think I just used an extra onion)
1 bay leaf
1 c dry white wine
1 sprig fresh thyme
1 sprig fresh tarragon
1/2 tsp fresh rosemary, chopped
Pan drippings from the turkey (recipe called for neck/heart/gizzards, but I opted out of that one), fat strained off if desired
5 c chicken broth
1/8 c GF flour (I think I used a sorghum flour mix)

Melt half of the reserved butter in a large pot over med-high heat. Add shallots and bay leaf. Saute about 20 minutes, or until browned. Add wine and herbs, and bring to a boil. Boil until the liquid has reduced to a glaze. Add half of the pan drippings and broth. Return to a boil. Once boiling, reduce heat to low. Cover and simmer for about an hour. Pick out the herb sprigs and bay leaf. Add enough of the remaining pan drippings and chicken broth to make about 5 cups of gravy.

In a large pot, melt the remaining half of the butter over medium-high heat. Add flour, and whisk for about a minute. Slowly add the gravy, mixing constantly w/ whisk. Cook until the gravy thickens. Taste, and season with salt and pepper if desired.


*Note, I didn't half the gravy recipe, b/c I love gravy!! I only halved the butter, but you get enough flavor w/ the pan drippings mixed in.

**Gluten free flour blends work fine for this. I would also suggest a starch, like cornstarch, or tapioca. It makes the gravy a bit shiny, but it tastes the same, in my opinion. I usually use whatever starch I have on hand.


Next on the Turkey Day Preview agenda: Some tips for getting through the holiday meal unscathed, as well as the incredible chocolate pecan pie I made for dessert last year! Everyone loved it! All of my gluten-eating relatives! But hey, what's not to love about chocolate, right? Stay tuned.

Thursday, November 04, 2010

Vegan Mexican Chocolate "Ice Cream"

Wow, when I got online 3 hours ago, I had every intention of actually posting some recipes tonight. Heh. Well, getting behind on my blogging also put me behind in my blog reading. I guess I find everyone else's blogs more interesting than my own :)

So, I've been really busy the last couple of months. Reeeeeeeeeeeeeeeally busy. Much more so than I enjoy. I'm more of a laid-back personality, and running a hundred miles an hour is not my favorite thing to do, day in and day out. I've had work, lots of work stuff, training a new girl, taking on new responsibilities as our company grows and changes. I've also gone through a couple of weeks being sick, as well as having a sick cat. I've had family in town and get-together's. I've had an anniversary (SEVEN YEARS ALREADY???). I've had a birthday (NINETEEN AGAIN?? lol jk). I've also had weekly battles with the piles of clothes and dishes that seem never-ending. It's not been all bad, but still, more than I would choose to have on my plate at once.

And in the spare time I have had, I've snuck in my new favorite book series - The Dragonriders of Pern - as well as the occasional weekend WOW-obsessed indulgence with my husband. Yeah, we did spend approximately 15 hours last weekend gaming. Oops.

I have also spent quite a bit of time in the kitchen. I gotta. A girl has to keep herself and her man happily (and allergy-free) fed. I'm super excited to share my pumpkin-fest results, especially the amazing birthday cake I made myself, which I might have to say is the greatest thing I've ever made! Like, EVER. Get excited with me here. Just you wait...

I'm not quite so excited to talk about my quick bread failures. I've decided that I'm more of a muffin kinda gal. But I'll get there. I promise. All these things will be blogged about. Before Thanksgiving, I hope, as I'll have more turkey day recipes to post by then. Oh, and I need to post about my favorite turkey preparation method, seeing as I'm already planning it again for this year.

Right now, aside from this update to excuse my recent absence from the blogging scene, I'd like to share a recipe I made that totally rocked! Remember the super-delicious Mexican chocolate bark I made a couple years ago? Well this recipe reminds me of that. Only it's ice cream!

I've wanted to try this recipe by Elana over at Elana's Pantry for a long time now. Once I got all the pumpkin out of my system, I was ready for something chocolate-infused. This ice cream was it! Yes, I know, winter is rapidly approaching, but I may still be in denial of this (although I did finally resign myself to putting the top back on my Jeep). So of course I listened to the call of ice cream calling my name. There is such a great combination of sweet, chocolatey goodness, with just enough of a spicy bite to tickle the back of the throat.

I was really pleased with how this recipe turned out. However, I found the aftertaste a tad spicy for my current mood. I think I would either tone down the cayenne more, or add some sort of chocolate sauce on top. Or...Mexican chocolate bark!

View the original recipe here (with a fantastic photo by Elana!)

Vegan Mexican Chocolate "Ice Cream"

28 oz almond milk (3 1/2 c or so - I used homemade almond milk, but with half the water added)
1/4 c agave nectar
1 c dark chocolate (I used half a cup of dark chocolate from a bar, and filled the cup w/ enjoy life chocolate chips)
1 tbsp ground cinnamon
1 pinch salt
1/8 tsp cayenne pepper (I halved Elana's suggestion of 1/4 tsp, and would go lower next time, probably half of this again)
1 tsp ground coffee or espresso
1 tbsp vanilla extract (I was a little generous with my tablespoon, but the flavor didn't overpower anything)

Heat the milk and agave to a boil in a medium pot.

Reduce heat and stir in the chocolate, mixing until completely melted. Remove from heat.

Cool mixture for 1 hour (I stuck mine in the fridge for the last half hour to ensure it was cool enough to add to the ice cream maker).

Add the remaining ingredients, and stir well.

Pour into your ice cream maker, and mix away. Follow the instructions for your machine. Mine took about a half hour to mix. The machine turned off, saying the motor was overheated, but the ice cream was still a little soft, so I stuck it in the freezer for a few more minutes.

Serve and enjoy!


P.S. Forgot to mention, this recipe is just one of many delicious dishes you'll find at Linda's Gluten Free Wednesdays! Head on over and join the party!

*UPDATE: This is a great ice cream to make a milkshake out of! Especially if you want to tone down the heat a bit. Just scoop some into a blender, add some almond milk/other milk sub, a little bit of cocoa and agave (to give it a bit more chocolate flavor), and blend until smooth. Genius!!