Showing posts with label beverage. Show all posts

Thursday, December 20, 2012

Fave Pregnancy Drink

I've always enjoyed a hot cup of herbal tea when I've been sick, or to help de-stress. However, drinking tea while pregnant has been a challenge for me.

Before we tried to get pregnant, I was chugging red raspberry leaf tea, as I'd read that it is a uterine tonic, as well as a fertility booster. I don't know if I can chock up my quick success to the tea, but it sure didn't hurt our chances! I determined to continue drinking the tea throughout my pregnancy.

Red raspberry leaf tea consumption is widely recommended by midwives and natural health promoters to help during pregnancy, especially the last trimester, when the body is getting ready to evict that cute little baby.

During my first trimester, I went through a lemonade kick. One day it occurred to me that I could mix my RRL tea and lemonade, to create an awesome iced tea. It worked! I just brewed a few cups of tea, then subbed that in for some of the water when making the lemonade. It was delicious.

Currently, my favorite way to enjoy RRL is an iced tea brewed with Tazo Passion herbal tea, which has a wonderful, slightly tart and fruity flavor. I'll brew the two together, then mix in some honey, allow to cool, then add in some fresh-squeezed lemon or orange, and enjoy over ice.


If you want more information on the benefits of red raspberry leaf tea, check out this great blog post.

Sunday, September 23, 2012

Chocolate Chip "Milkshake" (Green Smoothie)

Yup, this is the latest and greatest of my green smoothie experiments. I've been on something of a cashew milk kick lately, and for some reason all that creamy goodness has me craving milkshakes! This baby boy LOVES his milkshakes!

The other day, I was craving a chocolate milkshake, and then once I created it, I realized that what I really wanted was chocolate chip ice cream! So I took the smoothie a bit further...

I've played with this one a bit over the past few days, and have really come to enjoy it. Of course, I added the avocado and spinach to justify it as a "healthy" treat ;)

As with most of my smoothies, the measurements are more of approximations. Taste test as you go, and you'll come up with results that work for you.

A great tip I wish someone would have told me awhile back is to experiment slowly w/ avocados in sweets. I absolutely love avocados, and obviously I love dessert, but I jumped in too fast with trying them out together, and had a few bad experiences before I figured out that I liked to add avocado slowly. Here's my rule of thumb: Start w/ half of the amount of avocado called for in a recipe (unless it's the centerpiece ingredient), then taste and add a little more if you like it, and then a little more...and compensate if it becomes too strong (add more chocolate, sweetener, etc). I really don't want to actually be able to *taste* the avocado in my smoothie, but it does add to the texture. Plus, it's a fantastic, healthy fat!

Anyway, back to the recipe!


Chocolate Chip "Milkshake" Green Smoothie
Gluten free, dairy free, coconut free, can be nut free
Makes about 2 c (1 large serving)

1 banana, cut into chunks and frozen
1-2 tbsp almond butter, or other nut/seed butter
1/2 c cashew milk, or milk of choice
1 1/2 - 2 tbsp cocoa powder
1/2 - 1 c raw spinach
1/4 - 1/2 avocado
Additional sweetener, to taste (I have enjoyed a couple drops vanilla stevia, and a dollop of molasses the most)
A couple ice cubes
1 tbsp dairy free chocolate chips (I use Enjoy Life)

Blend all ingredients except ice and chocolate chips in a high-powered blender, until smooth. Taste, add additional sweetener, liquid, cocoa, as desired.

Add ice and chocolate chips. Blend again, until ice is incorporated. Serve and enjoy!


Saturday, September 15, 2012

Newest Dairy Free Obsession - Cashew Milk

I've mentioned in previous posts that going dairy free was just as hard for me, if not more difficult, than going gluten free. I miss all the smooth, creamy sauces, melty cheeses, and rich ice creams of my past. Unlike the plethora of easily replaceable gluten free foods that taste just as good as the "original," there seem to be few products that legitimately work as dairy free substitutes.

One dairy replacement product that I truly loved was coconut milk. Coconut milk is a very versatile substitute for many dairy-based products, such as cream and milk. It can be used in savory recipes as well as sweet. The best dairy free ice cream I have ever had was made with coconut milk. I also loved this lemon cream coffee cake, and made it several times. However, sadly, I developed an intolerance to coconut...so that had to go too :(

I've experimented heavily with using nuts as dairy replacements - from my favorite almond milk, to cream cheese substitutes. I have found that nuts work exceptionally well in many forms to create a pretty good milk or soft cheese sub.

Lately, I've been on a nut milk kick. Blame it on being pregnant, where I am consuming way more refined carbs than I'd normally eat. The only thing that seems to appeal to me first thing in the morning is cereal. Thank goodness for GF Rice Krispies and the GF Chex line! When I am ill-prepared, I'll grab a box of store-bought almond milk out of the pantry, and choke that down w/ my cereal. However, nothing beats the consistency and flavor of freshly-made nut milk.

Enter cashew milk.


This has become my go-to recipe for surviving the mornings. It's incredibly rich, it's creamy, and it can be sweetened if you want to have a glass with your favorite gluten free cookies! It works fabulously in smoothies, milkshakes, and ice cream.

Even better, unlike the process of making almond milk, there is no straining involved with cashews! Just run your high-powered blender long enough, and it will get the job done quick and easy! Note: If you don't have a high-powered blender, I would recommend soaking your cashews for at least an hour before processing them, to make them softer.

You can alternate between the sweetener of your choice. I have tried Elana's recipe w/ agave nectar, Gena's vanilla-tinted variation w/ soaked dates, and I've even experimented with adding stevia or a bit of molasses for the calcium benefit. All have turned out great, but I think the agave nectar might be my favorite.

The "recipe" for cashew milk is really quite simple. Give it a try sometime, and you'll see why I love this creamy dairy free drink!


Cashew Milk
Gluten free, dairy free, coconut free, grain free/Paleo

1 c cashews, soaked at least 1 hour
4-5 c filtered water
Sweetener of choice (agave nectar or a few dates soaked for 20 min), to taste
A pinch of salt, if desired
A splash of vanilla extract, if desired

Rinse cashews well after soaking. Combine with other ingredients in a high-powered blender. Blend for 2 minutes on high. Taste, and add additional sweetener if desired.

Serve chilled, and stir well before use. Stores well for 3-5 days.

Notes:

*Most of the recipes I've seen recommend soaking your cashews for 1-8 hours, but I've skipped this step numerous times, and still had success.

*You can also thin the milk out a bit more with an extra 1/2-1 c water, if you'd like to get more bang for your buck.

*One great tip for that last-minute cashew milk craving: Throw a couple ice cubes in with your serving of milk and blend. This will chill the milk enough to pour over cereal.

Monday, April 23, 2012

Hint of Chocolate Green Smoothie - GF/DF/SF

So, here's a quick fun little recipe for your enjoyment this evening.

I LOVE green smoothies. This just so happens to be my new favorite smoothie. It also has one of my new favorite foods in it.


Raw cocoa/cacao butter! I love this stuff! I especially love scraping the extra oil up after I melt it for my smoothie, and rubbing it all over my hands. P.S. I bought my cocoa butter on amazon. It was about $15 for a pound.

The smoothie is pretty simple to make. It's also quite versatile, so play with it. I decided to use cocoa butter since I'm trying to consume more fats, and can't have coconut. I had just bought the cocoa butter because I really want to try making my own lotion or body butter. Yes, this makes me a little bit hippie (we don't use the H-word in our house...all sorts of jokes generally follow - mostly my husband's doing).

Anyway, back to the recipe. Give it a try, adjusted to your tastes.

Hint of Chocolate Green Smoothie 
Gluten, dairy and sugar free

Makes 1 serving

1/2 - 1 banana
1/2 - 3/4 c almond milk or milk of your choice
a handful or two raw spinach
2 tbsp cocoa butter, melted
1 tbsp chia seeds
1 - 2 tbsp almond butter or handful of nuts
1/3 c crushed ice
a splash of vanilla
a couple drops of stevia (optional)
1 - 2 tbsp cocoa/cacao powder (optional, but makes the chocolate flavor more potent)

Add all ingredients except the ice to your blender. Blend on high until smooth, about a minute or two. Taste, and adjust accordingly. Add ice, and blend again.

Serve and enjoy!


Note: I have made this several times while on a sugar free diet. The only sugar I'm allowed is one serving of green banana a day. So, while I think this is good and very sweet just the way it is, you may feel the need for additional sweetener. Add away!

Wednesday, May 04, 2011

What have you been eating lately?


I don't know if anyone really even cares...but I'm gonna share anyway :)

I know a lot of people go through phases of eating patterns. Some of it has to do with the seasons (soups in winter, salads in summer), some has to do with what's available at the store/in the garden. Some of it has to do with what's easy, fast, and/or good.

Even though I haven't been posting a lot of recipes, obviously I have been eating over the past few months. So I thought I'd share a bit of what's been entertaining my dinner plate lately.

I've been trying to eat a lot more fresh foods, ie, veggies. I've been planning a lot more meals around what leafy goodness will be highlighting the meal. It's been a challenge at times, but a lot of fun too. Makes my husband laugh when I come home and make a plateful of kale chips...but have no other ideas of what I'm going to eat for dinner.

Green smoothies have been more prevalent in my daily routine. I'm a big breakfast person, and need lots of fuel to get through the mornings, especially after hitting up the therapy. Most days I'll eat eggs and muffins, or toast w/ hazelnut butter awesomeness.

New love affair.

And yes, I have been known to sneak spoonfuls of this stuff. You might be surprised at the number of spoons lounging around my house right now. Unless you'd tried this butter. Then you'd understand.

After eating breakfast, I'll cram some berries/banana/orange/apple/avocado, almond milk, spinach and chia seeds into my Vita-Mix, liquefy, and pour it all into my favorite starbucks cup, just in time to dash out the door.

On the weekends, I've also indulged in smoothie experiments, such as the chocolate-almond smoothie (easy on the banana, add a handful or two of spinach). I have even got the hubs to drink a couple dreaded green smoothies (added some peanut butter to his). I'm trying to see just how much green stuff I can cram into a smoothie without making it taste like a salad :)

I've been experimenting lately with this great new sugar substitute: Stevia! Look at this fantastic haul that I won from Iris over at The Daily Dietribe!


I'm totally digging the vanilla liquid stevia! It's amazing in chia seed pudding! Which is something else I've been eating a lot of lately. Chia seeds. I love 'em! In smoothies, in puddings, added to hot cereal. More to come on chia seeds...

This chocolate chia pudding recipe has been a staple for me lately. It's soooo good! I was recently given some cacao powder, which I'm enjoying, and have been adding it to this pudding in place of cocoa.


Mayan superfood! Yay!

I also love making the chia seed pudding cacao-free, and adding extra vanilla. Topped with some buckwheaties and berries - trust me, it's the perfect afternoon delight!

Also been eating my favorite staples: avocados, kale (new favorite: kale salad - shred up some kale, drizzle with EVOO, sprinkle w/ S&P, then "massage" everything into the kale for a couple minutes), my favorite GF bread, quinoa, and sweet potatoes.

So, that's about it. I'd love to hear what everyone else is eating!

Tuesday, November 23, 2010

Celebrate!! With the best dessert ever!


I've got many things to celebrate today! First of all, this is my 100th post! Wow! I remember starting this blog more than 4 years ago, and am amazed that I found so much to write about.

Even more exciting, when I logged on tonight, I discovered I had a new follower! I know 30+ people subscribing to my blog isn't an overwhelming milestone, but it makes me happy. I started writing here so that I could share my experience with others, hopefully making their lives easier. I hope I've been able to do that for all of you. I appreciate your comments and all of your awesome blogs as well! You know I'm more interested in reading than writing, though I do occasionally manage to find something worthwhile to share here. Thanks for sticking around as I've improved on my gluten/dairy-free cooking, blogging and photography skills!

The last thing I want to celebrate today really is the best dessert I think I've had since discovering all my food issues (if not the best dessert I've ever had in my life...). And let me be clear. I love my desserts. And I've made and eaten quite a few good ones. This one, however, takes the cake! Or rather, the cheesecake (I know, I know, groan-worthy. I'm sorry...I had to!)

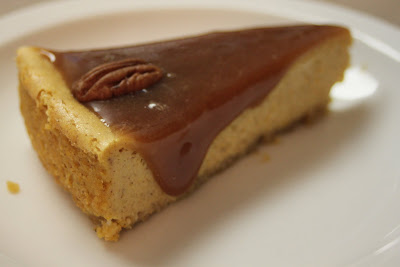
Feast your eyes on this beauty:


Pumpkin cheesecake with a caramel dulce de leche topping. Yep, it's as good as it sounds. When I was debating what to make for my birthday at the beginning of the month, I just kept coming back to this gorgeous photo, and the recipe attached. I took a poll, and this one was the one everyone suggested. So glad I tried it, and so were my friends and family! Even my cheesecake snobs and cheesecake dislikers enjoyed it!

I know this is super late for the Thanksgiving feast. If you've already got something lined up for the big day, I would recommend making it in a couple days, once everyone's had a chance to digest. They will thank you for it.


Pumpkin Cheesecake with Dulce de Leche & Pecans
Gluten & Dairy Free

3/4 c crushed Cinnamon Chex (I used Rice Chex with a sprinkling of cinnamon)
1/2 c finely chopped/ground pecans
2 tbsp white sugar
2 tbsp brown sugar
1/4 c butter substitute, melted (I used Earth Balance spread)

3/4 c white sugar
3/4 c pureed pumpkin (Check out this great post on easy crockpot cooking of your pumpkin, or you can always use the stuff from a can)
3 egg yolks
1 1/2 tsp ground cinnamon
1/2 tsp ground nutmeg
1/2 tsp ground ginger
1/4 tsp salt
3 (8 ounce) packages cream cheese substitute (Tofutti was a winner!)
1/4 c plus 2 tbsp white sugar
1 egg
1 egg yolk
2 tbsp sour cream sub (Tofutti again. Original recipe called for whipped cream)
1 tbsp cornstarch
1 tsp vanilla extract (recipe calls for 1/2 tsp vanilla, 1/2 tsp lemon extract, which I didn't have)
Dulce de Leche (for topping)**
Whole pecans (for topping)


Preheat the oven to 350 degrees F.

Combine first 5 ingredients in a small bowl and mix well. Sprinkle into a 9-inch springform pan, pressing lightly until bottom of pan is covered.

Mix together 3/4 c white sugar, pumpkin, 3 egg yolks, spices and salt in a meidum bowl. Set aside.

Dump the cream cheese into a larger bowl. Beat w/ an electric mixer until light and fluffy (ish. Mine never got that fluffy). Slowly add 1/4 c plus 2 tbsp white sugar, and beat. Add egg, egg yolk, and sour cream; beat well again. Add the corn starch and vanilla. Beat once more until mixture becomes smooth.

Add the pumpkin mixture to the cream cheese mixture and mix well. Pour into the springform pan. Place pan on a cookie sheet lined with foil in case you have any leakage.

Bake cheesecake in the preheated oven for 50-55 minutes. Don't overbake it. The center will firm up when chilled. Once it's done, turn the oven off, and crack open the door. Leave cheesecake in the cooling oven for 1 hour (this helps prevent the top from cracking).

Once cooled, remove from oven. Cover and refridgerate until ready to dig in. Remove the pan siding (I didn't risk taking the cake off the bottom of the springform pan, so not sure how that would work), and decorate cheesecake with dulce de leche and pecans. (Just FYI, the dulce de leche will stick to anything you try and cover the cheesecake with. You may want to keep the pan siding around to place around the cake if you're covering and refridgerating w/ the topping on).

Serve, and enjoy the praise you will be receiving from those you deem worthy to partake with you in this heavenly experience.


**Dulce de Leche done dairy free

I followed this recipe from allrecipes.com, quartering the original measurements. It worked beautifully! This recipe takes about an hour to make (10 min for processing your own almond milk, and about 45 minutes of stirring to get the dulce de leche to the right consistancy). Read the comments below the recipe on allrecipes if you need help w/ making this.

Dairy Free Dulce de Leche

4 cups homemade almond milk (recipe here)
Approx. 1 tsp vanilla extract, or 1/4 vanilla bean
1 c plus 2 tbsp white sugar
1/4 tsp baking soda

In a large saucepan (yes, you do need to use a large one, b/c this stuff foams), bring the milk to a boil over medium-high heat (original recipe calls to strain at this point, but I found this an unncessary step, as there was nothing to strain in here).

Add vanilla, then stir in the sugar. Stir constantly until the sugar is dissolved. Just before the mixture begins to boil, stir in the baking soda.

Turn heat down to medium. Continue to stir constantly for the next 40-50 minutes, until the midxture thickens (grab a good book and a stool so you can sit by the stovetop). I figured mine was done when it resembled a caramel sauce that you would use on ice cream. Not too runny, but not too thick. Takes a minute to come back together when you divide it by running a spoon through it.

Remove from heat, and pour into glass or other heat-proof dish to cool. Once it's cooled a bit on the counter, cover and stick in the fridge to chill before using. Don't use on the cheesecake until the dulce de leche is totally cold.

Makes about 1 1/2 cups (8 servings, supposedly, and just enough to top the cheesecake!).


P.S. Before you dunk that empty, caramely, sticky pan in some water to wash it out, put it back on the stove, add some almond milk, and warm it over med-low heat for a few minutes. Pour into your favorite coffee mug, and enjoy! Makes cleanup that much sweeter :D

P.P.S. This recipe is linked up to Linda @ The Gluten Free Homemaker's Gluten Free Wednesdays event! Check it out!

P.P.P.S. This recipe is also linked up to Amy @ Simply Sugar & Gluten Free's Slightly Indulgent Tuesdays, Diane @ The WHOLE Gang's Holiday Party, where she is giving away some great cookbooks, as well as Alex's The 12 Days of Bloggie-mas @ A Moderate Life.


Monday, March 22, 2010

Healthy Green Smoothie

Don't judge the picture. I know it doesn't LOOK yummy, but it is :)

I found this recipe over at Winnie's blog, Healthy Green Kitchen.

I love my Vita-mix and am always looking for new ways to use it! This one intrigued me, as it uses two of my favorite green foods: avocados and kale. The combination doesn't sound that amazing, but it is actually pretty good. In the past, I've made fruit smoothies with a few handfuls of spinach, which I totally love (and you REALLY can't taste the spinach, for real!).
So I gave it a go.

I love this recipe! I've tried it with a few variations. I've added a bit of sugar/agave. I've added some pineapple juice. I've added almond milk. I like 'em all.

Just experiment, and see what works for you. This will make 2-3 servings, but it's better fresher, so half the recipe if you wish.

Green Smoothie
1/2 in. piece of ginger, peeled
1/4 slice of lemon
A splash of water
1-2 apples, cored (I've also used applesauce and it works just as good)
5 stalks of kale, stems removed
1 avocado, peeled and pitted
A pinch of sea salt
1/4-1/2 c almond milk or water
Optional: a bit of sweetener, fresh pineapple

Combine the ginger, lemon and water in the blender. Process for about a minute. Pour through a fine mesh sieve into a glass, pressing on the solids.
Rinse blender, and pour the ginger liquid back in. Add remaining ingredients (go slow with the milk), and blend for 1-2 minutes, until completely smooth. Add more liquid as needed. Taste to see if it needs more of anything.
Serve and enjoy!

Don't you feel so healthy?

This post is linked to Slightly Indulgent Tuesday!

Friday, February 12, 2010

Chocolate Chip Scones and Almond Milk


This is my new favorite snack/dessert! Chocolate chip scones and homemade almond milk.

The scones recipe I got from Elana's new cookbook, "The Gluten Free Almond Flour Cookbook." I reduced the amount of chocolate from 1 cup, and the original recipe calls for chopped dark chocolate, but enjoy life chocolate chips worked great!

Chocolate Chip Scones
2 ½ c blanched almond flour
½ tsp salt
½ tsp baking soda
1/3 c olive oil
¼ c agave nectar
2 large eggs
¾ c chocolate chips
Preheat oven to 350 degrees. Whisk together wet ingredients. Mix in dry ingredients. Fold in chocolate chips. Scoop out onto parchment lined baking sheets, 2 inches apart (8 per sheet). Bake for about 13 minutes, until golden brown. Let cool on baking sheets for half an hour. Serve. Makes 16 scones.

These are great reheated from the freezer. I like to microwave them until just barely warm, then throw them in the toaster oven for a minute or two to firm up again.
I love the flavor of these scones. To me, there is even a hint of a coconutty flavor...probably from the almonds. I love it!


On to the almond milk....

I've been dairy free (mostly) for 2 1/2 years. I haven't had a drink of milk in that entire time. Usually I'm okay with that. But once in awhile, I get the craving to just chug a glass of ice cold milk. Substitute milk products just never wowed me. I'd drink some chocolate soy milk occasionally, and buy whatever's on sale (usually almond breeze) when I needed something to use in cooking/baking.
This recipe is really simple. I've made it several times in the past few weeks, and I love it. To me, it's not exactly milk, but it's definitely a close substitute. I feel like the texture is the same, and when you take a drink, it feels milk-like in your mouth. The almond aftertaste is what throws it off. It isn't bad, but for those looking for a REAL milk-like substitute, this may not wow them. I was pretty impressed though!
The greatest part is, it's healthy, doesn't have any weird additives, and it's cheaper than buying the stuff at the store. I stock up on my almonds when they're $3-$4 a pound at the HFS. 1 pound equals about 2 cups of almonds....which equals about 2 quarts of almond milk. For $3-$4!! That's about what I pay at the store for ONE quart of almond milk. Plus, I feel like the stuff at the store is a bit thinned out. I like how rich the homemade stuff is.

Anyway, enough trying to sell you on the idea :) Try it out for yourself. Then you'll see what I'm talking about! Visit Amy at Simply Sugar & Gluten Free for more info. She's the one who turned me on to this amazing discovery!

Homemade Almond Milk
1/2 c almonds
Enough water to cover (for soaking)
2 cups water
Optional: salt, vanilla and choice of sweetener (I haven't tried adding anything to my milk. I've enjoyed it the way it is).

Put the almonds in a glass jar or bowl. Cover with water, then cover bowl. Soak overnight (or for a few hrs) at room temperature.
Drain water, rinse almonds well.
Pour 2 cups of water into a blender. Add almonds. Blend on high for 2 minutes. Pour through a cheesecloth-lined fine mesh sieve (I did this in portions. I would pour probably 1/2 c liquid in, then let it drip a bit, then gather the cheesecloth together and gently squeeze until all the liquid's out. I then scooped out the almond grinds and threw them in a ziploc bag. Still haven't figured out what to do with them. Then I rinsed the cheesecloth, and relined the strainer).
Keep refrigerated and covered. Lasts about a week. If you don't drink it sooner!!

Enjoy!

Saturday, September 27, 2008

Garden Party Lemonade

Here's a goodie! I stumbled across this recipe while perusing the pages of Simply...Gluten-Free. Carol, you rock!
I must admit, I was a bit skeptical, but very intrigued. So much that I went out to the farmer's market to get a cucumber, and stole some dill from my cousin's husband's indoor herb garden (no, I didn't really steal it, he made me trim all his herbs and take them home).
Here's the original post, and while Carol's looks a bit more elegant, I suppose it's how it tastes that really counts :)


Garden Party Lemonade

1/2 cup freshly squeezed lemon juice (about 3 lemons)
1/2 seedless cucumber, peeled
1 sprig of fresh dill
1/2 cup sugar plus 1/8 cup to add later if needed
2 1/2 cups water
Option Garnishes – lemon slices, dill sprigs, cucumber spears

Put all ingredients (except the extra sugar and the garnishes) in the blender, and blend for about a minute. Taste and add more sugar if desired. Pour over ice, add garnishes if desired, and enjoy. One thing I did notice - when I first poured it up, it was pretty foamy on top. When I let it sit in the fridge for awhile, the foam went away, and it was easier to drink. I think I will let it chill awhile before serving next time.
Makes about 3 cups, and probably 4-6 servings (although I drank half with my lunch, and half with my dinner).

Wednesday, June 04, 2008

Lots of Catching Up To Do

Yet another successful meal thanks to the recipe from my favorite GF cookbook "Life Tastes Good Again."
Here we have the finished product - Super Yummy Meatballs over Spaghetti.


Ok
so the cheese isn't real, more for the visual remembrance of cheese. True, it shreds and melts JUST LIKE CHEESE, but without that actual cheesy taste...it doesn't quite have me fooled.


Here we have the meatballs in their naked-looking raw form. I actually made this recipe last week, and we liked it so much, I thought I'd try it again last night. The first time, I used onion powder, and in this batch, I used a real onion, much to my hubby's chagrin...curse my mother in law for never making her kids eat real onions! Seriously! They rock. Sometimes. (Ok, I won't admit it to him, but I wasn't as impressed with the oniony batch either...but still, sometimes, onions are great!).


Here's my beautiful red bowl from Williams Sonoma, where I did the dirty mixing. K, so my refrigerator is possessed. Every time it gets too cold, I turn the temp up, and yet, somehow it always turns itself down. I think it's out to get me. I always seem to forget this when playing with raw meat until I get it between my fingers. It was so cold it gave me a brain freeze! True story! So I tried to make the meatballs with the two spoons...then got too impatient, and got my hands messy again. At least it was faster :)


This is proof that yes, I do in fact wear an apron when I cook, and that the oil stains just sneakily work their way onto my shirts. I promise, Honey :)

Meatballs Recipe
1 lb ground beef (first time I made these, I used turkey, kinda liked that better...although it could have been the onions)

1 small onion, minced (or onion powder)

1/2 c GF bread crumbs ( I used the now GF Rice Chex cereal, and crushed it with the measuring cup)

1 egg

2 tbsp milk (I used both almond and soy)

2 tbsp oil (I only used one tbsp w/ the beef, a little fattier)

3/4 tsp salt

1/4 tsp pepper

Heat oil in a large saute pan over medium. Combine all ingredients. Form into balls and brown in oil. (I chose to flip the balls halfway. With the turkey, they got very nicely browned. With the beef, I think there was too much liquid in there, and they didn't get as toasty or crunchy). Remove with a slotted spoon, and place on paper towels. Drain oil from pan.

*This part is not pictured, but I continued the recipe with my first batch (sorry for lack of photos, they were gone too fast)*

Add 3/4 c ketchup, 1/3 c water, 2 tbsp mustard, 2 tbsp brown sugar, and 1 tsp Worcestershire sauce to pan, and bring to a boil. Add meatballs, and simmer until hot. Serve over rice.


Here's what I had with my wonderful meal. A nice tall glass of Brazilian Lemonade. My favorite summer drink! And yes, it makes a mess in the sink, but even that smells good :)

Brazilian Lemonade:
1 c cold water
2 tbsp coconut milk
1/2 c soymilk
2 small key limes
1/4 c sugar

Chop off the ends and quarter the limes. Throw everything in the blender (vitamix in my case). Blend for about 30 seconds or so, until it gets frothy. Pour over a strainer into a glass with some ice in it. You'll have to empty the strainer a few times (see above picture). Kick back, relax, and imagine yourself lounging somewhere on a tropical beach as you enjoy.

(ok, not really tropical or warm...it was San Diego during Christmas, but still, it looked pretty!)


Here's another great recipe I found one night when I was craving chili, but not wanting to suffer the consequences of opening a can of it. I served it over potato wedges, but I'm sure it would be equally delicious over pasta or even rice. It was sooooo good! I didn't even miss the beans!

Cincinnati Chili
1 large onion chopped
1 pound extra-lean ground beef
1 clove garlic, minced
1 tablespoon chili powder
1 teaspoon ground allspice
1 teaspoon ground cinnamon
1 teaspoon ground cumin
1/2 teaspoon red (cayenne) pepper
1/2 teaspoon salt
1 1/2 tbsp unsweetened cocoa or 1/2 ounce grated unsweetened chocolate
1 (15-ounce) can tomato sauce
1 tablespoon Lea and Perrins Worcestershire sauce
1 tablespoon cider vinegar
1/2 cup water
1 (16-ounce) package uncooked dried spaghetti pasta

In a large frying pan over medium-high heat, saute onion, ground beef, garlic, and chili powder until ground beef is slightly cooked. Add allspice, cinnamon, cumin, cayenne pepper, salt, unsweetened cocoa or chocolate, tomato sauce, Worcestershire sauce, cider vinegar, and water. Reduce heat to low and simmer, uncovered, 1 1/2 hours. Remove from heat.
Cook spaghetti according to package directions and transfer onto individual serving plates.
Ladle chili over spaghetti and serve with toppings of your choice.
Here's the original recipe.


And Last but not least. The amazing "Lorka-Bread". My first, and very successful attempt at this recipe.

A definite success!I enjoyed a delectable meal of turkey sandwiches with chips and salsa (from Los Hermanos of course!).
Here's where to find the recipe, along with 20 pages of feedback and alterations.

And here's the version of the recipe that I used:

Gluten-Free Flax Bread
12-18 servings
1 loaf
2¾ hours 2 hours prep
1 1/4 cups gluten-free flour (for all the below flours, I just used a Featherlight flour mix)
1/4 cup garfava flour
1/2 cup potato starch
1/4 cup cornstarch
1/4 cup flax seed meal
2 1/2 teaspoons xanthan gum
2 teaspoons active dry yeast
1 teaspoon salt
2 eggs
2 egg whites ( used enough egg replacer for 1 1/2 eggs instead of the whites)
1 cup water or milk
2 tablespoons vegetable oil
2 tablespoons honey
2 teaspoons vinegar

Combine flours, flax, starches, gum, yeast, salt. In the mixer, combine wet ingredients, then add the dry. Scrape the sides, and mix on medium for 4-5 minutes. Pour into 9x5 pan, and let rise to top of pan (took about 80 minutes). I always, always let it rise in a turned off oven. Bake at 350F for about 40 minutes. Remove from pan, cool, and slice.

Ah, and we mustn't forget my divine experience at the Pier 49 Pizza restaurant.
Once, we tried to go up to the one in SLC (the one that was in the paper), but we got all the way up there, and they were out of crusts (note to self...call ahead *doh*)
Here's what I wrote about it the day I actually went:
"So I wanted to go out to pizza this week, and was going to be up in SLC on Thursday. Thought I'd plan that into my agenda. Then I read here on the forum about the other Pier 49's in the area bringing in the gluten-free crust. So I called the Springville, both of the Provo, and the AF locations. One of the Provo ones said they're getting some ordered, but they won't be in until next week. Then I tried the Draper location, and they said they had them!!! I asked about how they prepared the pizzas (on a separate, specific tray, using separate utensils, covering the pizza so it doesn't touch anything). I went, and enjoyed a beautiful, warm, delicious, filling pizza with Canadian bacon, tomatoes, and olives! I nearly cried. And I had enough for leftovers for lunch on Friday! Ah, it was divine. I told my husband that we're going to the Provo one as soon as they get the crusts in! YAY!!!"

I do have a copy of the article if anyone is interested. They no longer have it on the Tribune website.

Anywho, that's it for now :) Will try and be more on top of my posting.