Showing posts with label breakfast. Show all posts

Saturday, January 05, 2013

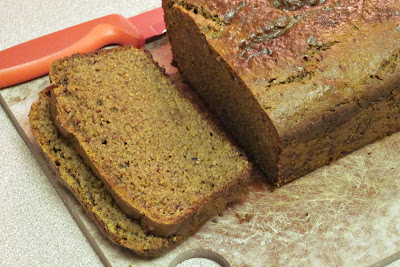
Amazing Cinnamon Bread - Paleo Style

I might be nesting, a little. Or just trying to alleviate my guilt at not having gotten much done over the past 3 weeks of "vacation" since I quit my job. One of the itches I've had as I've been sitting around the house, growing bigger, and becoming less productive, is baking. Partially to stock my freezer with food we can eat once our little coffee bean is here, and partially because I don't feel like I've done enough baking lately, and I really miss it.

This is my new favorite bread from The Paleo Parents. It's gluten free, and Paleo-friendly to boot! I haven't tried the bread pudding/French toast part of the recipe, but the cinnamon bread is awesome! I adapted the recipe by adding dates to the batter, instead of the raisins called for. The reason for this was that the Paleo Parents mention that this recipe is not overly sweet. The dates definitely helped with that!

This recipe is really great fresh from the oven, with some melted butter on top. 

Paleo Cinnamon Bread
Adapted from this recipe

2 c nut butter (almond butter is best, but it works great w/ Sunbutter* too!)
1 1/2 c blanched almond flour
4 large eggs
1/4 c maple syrup
1 tsp baking soda
1/2 tsp salt
2 tbsp cinnamon
1 tsp nutmeg
2/3 c soaked and pitted dates

Preheat oven to 350 degrees F.

Pulse all ingredients in a food processor until well combined. If batter is not smooth, add a bit of oil (this may happen, depending on the nut butter used).

Pour batter into a greased bread pan, and smooth the top.

Bake for about an hour. Bread should be golden brown, and a toothpick inserted will come out clean.

Cool on a rack in the pan for another hour. The bread will continue to cook a little bit more.

Slice, and serve, or use to make French Toast Casserole.

*Note: I tried this recipe with a combination of Sunbutter and almond butter, which worked just as well as the almond butter version. However, sunflower seed butter tends to turn green when combined with baking soda. So, eat same day, or don't freak out the next morning when you have greenish bread! It is harmless, and still tastes awesome!

Friday, September 28, 2012

Paleo Chocolate Mug Cake

I've seen the one-minute cake or microwave cake recipes floating around over the years. Before going GF, I even kept a box of chocolate cake mix on hand, with the exact measurements for a "single-serving" cake posted on my fridge. You know, just for that time of the month, and other emergencies which only chocolate could fix. But I never really gave the gluten free version a chance...

I got really excited earlier this year when I saw this Paleo Mug Cake recipe over at The Wannabe Chef's site. It was grain free, and had the option to be sugar free to! So I tried it out. I loved it! And then...I kept making it. Over and over and over again!


I've adapted this recipe a bit to suit my preferences. Honestly, I never measure the ingredients I'm adding, just eyeball it. I have added chia seeds to give it a little more texture, and for some extra fiber and Omega 3's. My favorite mix-ins are chocolate chips and/or nuts (walnuts or pecans work great). I also enjoy topping it off with a little something extra once it's made. Try an extra tablespoon of peanut/almond butter (let it melt on the hot cake). Or a dab of cashew cream. Or your favorite fruit preserves. However, it really is amazing just by itself.

Topped with extra chocolate chips and walnuts.

Give this little treat a try next time you have a craving for something rich and chocolatey! I promise, you will quickly become addicted as well.


Paleo Chocolate Mug Cake
Gluten free, dairy free, sugar free, grain free/Paleo, can be nut free

Serves 1

1 small, ripe banana
2 Tbsp nut/seed butter
1 egg
1 tsp vanilla
5-10 drops stevia, or 1-2 tsp agave (optional)
2 Tbsp cocoa powder (I like a mix of regular and dark cocoa)
1 Tbsp chia seeds
Mix-ins: 1-2 Tbsp chocolate chips, chopped nuts, dried fruit (optional)
Topping: 1 Tbsp nut butter, jam, whipped cream/cashew cream (optional)

In a small bowl, mash banana with a fork until it is smooth. Add nut butter, and mash again. Then add the egg, vanilla, and sweetener. Mix again until everything is well blended. Add cocoa and chia seeds, and mix very slowly (cocoa can be messy if you try and mix it too fast). Then stir in any mix-ins.

Pour batter into a microwave safe dish or mug. Do not over-fill the container, because this cake will rise in the microwave.

Microwave on high for 2 - 2 1/2 minutes, or until center of cake looks set.

Enjoy!

Cake can be eaten hot or cold. Or for breakfast. Or however you want it ;)

Topped w/ homemade Oregon blackberry-raspberry jam from my dad and step-mom! Amazing!

Sunday, September 23, 2012

Chocolate Chip "Milkshake" (Green Smoothie)

Yup, this is the latest and greatest of my green smoothie experiments. I've been on something of a cashew milk kick lately, and for some reason all that creamy goodness has me craving milkshakes! This baby boy LOVES his milkshakes!

The other day, I was craving a chocolate milkshake, and then once I created it, I realized that what I really wanted was chocolate chip ice cream! So I took the smoothie a bit further...

I've played with this one a bit over the past few days, and have really come to enjoy it. Of course, I added the avocado and spinach to justify it as a "healthy" treat ;)

As with most of my smoothies, the measurements are more of approximations. Taste test as you go, and you'll come up with results that work for you.

A great tip I wish someone would have told me awhile back is to experiment slowly w/ avocados in sweets. I absolutely love avocados, and obviously I love dessert, but I jumped in too fast with trying them out together, and had a few bad experiences before I figured out that I liked to add avocado slowly. Here's my rule of thumb: Start w/ half of the amount of avocado called for in a recipe (unless it's the centerpiece ingredient), then taste and add a little more if you like it, and then a little more...and compensate if it becomes too strong (add more chocolate, sweetener, etc). I really don't want to actually be able to *taste* the avocado in my smoothie, but it does add to the texture. Plus, it's a fantastic, healthy fat!

Anyway, back to the recipe!


Chocolate Chip "Milkshake" Green Smoothie
Gluten free, dairy free, coconut free, can be nut free
Makes about 2 c (1 large serving)

1 banana, cut into chunks and frozen
1-2 tbsp almond butter, or other nut/seed butter
1/2 c cashew milk, or milk of choice
1 1/2 - 2 tbsp cocoa powder
1/2 - 1 c raw spinach
1/4 - 1/2 avocado
Additional sweetener, to taste (I have enjoyed a couple drops vanilla stevia, and a dollop of molasses the most)
A couple ice cubes
1 tbsp dairy free chocolate chips (I use Enjoy Life)

Blend all ingredients except ice and chocolate chips in a high-powered blender, until smooth. Taste, add additional sweetener, liquid, cocoa, as desired.

Add ice and chocolate chips. Blend again, until ice is incorporated. Serve and enjoy!


Saturday, September 15, 2012

Newest Dairy Free Obsession - Cashew Milk

I've mentioned in previous posts that going dairy free was just as hard for me, if not more difficult, than going gluten free. I miss all the smooth, creamy sauces, melty cheeses, and rich ice creams of my past. Unlike the plethora of easily replaceable gluten free foods that taste just as good as the "original," there seem to be few products that legitimately work as dairy free substitutes.

One dairy replacement product that I truly loved was coconut milk. Coconut milk is a very versatile substitute for many dairy-based products, such as cream and milk. It can be used in savory recipes as well as sweet. The best dairy free ice cream I have ever had was made with coconut milk. I also loved this lemon cream coffee cake, and made it several times. However, sadly, I developed an intolerance to coconut...so that had to go too :(

I've experimented heavily with using nuts as dairy replacements - from my favorite almond milk, to cream cheese substitutes. I have found that nuts work exceptionally well in many forms to create a pretty good milk or soft cheese sub.

Lately, I've been on a nut milk kick. Blame it on being pregnant, where I am consuming way more refined carbs than I'd normally eat. The only thing that seems to appeal to me first thing in the morning is cereal. Thank goodness for GF Rice Krispies and the GF Chex line! When I am ill-prepared, I'll grab a box of store-bought almond milk out of the pantry, and choke that down w/ my cereal. However, nothing beats the consistency and flavor of freshly-made nut milk.

Enter cashew milk.


This has become my go-to recipe for surviving the mornings. It's incredibly rich, it's creamy, and it can be sweetened if you want to have a glass with your favorite gluten free cookies! It works fabulously in smoothies, milkshakes, and ice cream.

Even better, unlike the process of making almond milk, there is no straining involved with cashews! Just run your high-powered blender long enough, and it will get the job done quick and easy! Note: If you don't have a high-powered blender, I would recommend soaking your cashews for at least an hour before processing them, to make them softer.

You can alternate between the sweetener of your choice. I have tried Elana's recipe w/ agave nectar, Gena's vanilla-tinted variation w/ soaked dates, and I've even experimented with adding stevia or a bit of molasses for the calcium benefit. All have turned out great, but I think the agave nectar might be my favorite.

The "recipe" for cashew milk is really quite simple. Give it a try sometime, and you'll see why I love this creamy dairy free drink!


Cashew Milk
Gluten free, dairy free, coconut free, grain free/Paleo

1 c cashews, soaked at least 1 hour
4-5 c filtered water
Sweetener of choice (agave nectar or a few dates soaked for 20 min), to taste
A pinch of salt, if desired
A splash of vanilla extract, if desired

Rinse cashews well after soaking. Combine with other ingredients in a high-powered blender. Blend for 2 minutes on high. Taste, and add additional sweetener if desired.

Serve chilled, and stir well before use. Stores well for 3-5 days.

Notes:

*Most of the recipes I've seen recommend soaking your cashews for 1-8 hours, but I've skipped this step numerous times, and still had success.

*You can also thin the milk out a bit more with an extra 1/2-1 c water, if you'd like to get more bang for your buck.

*One great tip for that last-minute cashew milk craving: Throw a couple ice cubes in with your serving of milk and blend. This will chill the milk enough to pour over cereal.

Friday, September 07, 2012

Chex on sale!!


Here's a sweet deal!! I just hit up our local Macey's grocery store and stocked up on their honey nut, cinnamon and corn chex. I paid $1.69 a box! This sale applies to every 4 boxes bought. Make sure you watch them apply the discount for each group of 4. I had to have them credit my card b/c they missed one :)

Thanks to Eating Gluten Free for sharing this!

For all those in the western US: If you live near an Associated Foods store (if a store near you sells Western Family brands, they are likely an Associated Foods store), head in to stock up on Chex cereals this week. The Associated stores near me (Macey's and Ridley's) are selling Corn, Rice, and Cinnamon Chex for $1.69 and $1.50 a box (respectively). Broulim's (in Idaho) is also selling Chex this week for $1.50 a box, so I think it's a system wide Associated Foods thing. It's a pretty good price for a great GF cereal, so I thought I'd let you know!


Think I got enough???

Monday, April 23, 2012

Hint of Chocolate Green Smoothie - GF/DF/SF

So, here's a quick fun little recipe for your enjoyment this evening.

I LOVE green smoothies. This just so happens to be my new favorite smoothie. It also has one of my new favorite foods in it.


Raw cocoa/cacao butter! I love this stuff! I especially love scraping the extra oil up after I melt it for my smoothie, and rubbing it all over my hands. P.S. I bought my cocoa butter on amazon. It was about $15 for a pound.

The smoothie is pretty simple to make. It's also quite versatile, so play with it. I decided to use cocoa butter since I'm trying to consume more fats, and can't have coconut. I had just bought the cocoa butter because I really want to try making my own lotion or body butter. Yes, this makes me a little bit hippie (we don't use the H-word in our house...all sorts of jokes generally follow - mostly my husband's doing).

Anyway, back to the recipe. Give it a try, adjusted to your tastes.

Hint of Chocolate Green Smoothie 
Gluten, dairy and sugar free

Makes 1 serving

1/2 - 1 banana
1/2 - 3/4 c almond milk or milk of your choice
a handful or two raw spinach
2 tbsp cocoa butter, melted
1 tbsp chia seeds
1 - 2 tbsp almond butter or handful of nuts
1/3 c crushed ice
a splash of vanilla
a couple drops of stevia (optional)
1 - 2 tbsp cocoa/cacao powder (optional, but makes the chocolate flavor more potent)

Add all ingredients except the ice to your blender. Blend on high until smooth, about a minute or two. Taste, and adjust accordingly. Add ice, and blend again.

Serve and enjoy!


Note: I have made this several times while on a sugar free diet. The only sugar I'm allowed is one serving of green banana a day. So, while I think this is good and very sweet just the way it is, you may feel the need for additional sweetener. Add away!

Sunday, September 18, 2011

Banana Nut Muffins - Paleo Style!

Funny story: My husband said to me on Tuesday night, "Did you know that it was National Celiac Awareness Day today?" I responded that I was aware, and asked him if he knew that. He said he did now, and I asked how he found out. He said he read it on Failbook, which is a website dedicated to sharing people's failures (it's rather hilarious, but can be crude). His statement cracked me up for some reason. We rely on social media to keep up to date on our friends' birthdays, the news, pretty much everything!

Anyway, things are going pretty well these days. Extremely busy, but it is what it is. Luke's writing up a storm, trying to get applications and essays in to 7 business programs, as well as working full-time and juggling a full load at school. Work is keeping me on my feet as well. I feel like when I'm at home, I do nothing but cook and wash dishes thanks to our paleo lifestyle, but other than that, the diet is going great! Been working out more too, which has been fun! Plus, the sun is back, for the next few days at least, and that makes me happy :)

I wanted to share a recipe that has literally saved me since my husband joined me in this paleo venture. I don't seem to have a hard time finding things to eat...but I really enjoy vegetables. Unlike my husband, whose repertoire of favorable veggies is rather sparse. So, in attempts to keep him fed, and from getting burned out on salads, chicken with (fill in the veggie blank), and bunless burgers, I have tried to find filling, satisfying snacks for him to enjoy. 

This recipe is gold.

We both love banana bread, and I really appreciate that this form of said food can be enjoyed without all the non-paleo ingredients, such as sugar, wheat, etc. It's an easy recipe to make, makes a lot, and the muffins are delicious when warmed with a bit of melted butter on top. 


Paleo Banana Nut Muffins
Adapted from the recipe in "The Gluten Free Almond Flour Cookbook" by Elana Amsterdam

3 c blanched almond flour
1/4 tsp salt
1 1/2 tsp baking soda
2 tbsp olive oil
3 large eggs
4-5 very ripe bananas
1 c chopped walnuts

Preheat oven to 350 degrees F. Line 12-18 muffin cups with liners.

Put the bananas into a bowl. Using a hand mixer, mash up the bananas. Add the oil and eggs, and blend until the mixture is smooth. Add the flour, salt and soda. Mix well. Add the walnuts, and combine. 

Spoon the batter into the muffin cups. Bake for 35 minutes, or until the muffins are golden brown. Check with a toothpick if desired. Let muffins cool in the pan for about half an hour, then serve.

*Note: The original recipe says that this recipe makes a dozen muffins. I don't know if I just have a small muffin pan, but I've gotten 15-18 muffins every time I've made it. 

These muffins freeze well, and travel well. They are great warm, but are just as good at room temperature. 

Enjoy!

Sunday, June 19, 2011

Giving in to (gluten-free) bread

Gluten free perfection a la Karina

Ever have one of those days? Where you try to think about everything and anything except for the one thing you're craving most?

Today was one of those days. I know in my last post, I talked about heading down a more grain free path. I've actually been doing pretty good so far. Not strictly Primal/Paleo, but I've been trying to reduce the number of carbs and actual grains consumed. The problem I've run into is being sick.

In the wee hours of the morning on Tuesday, I awoke with severe cramping. It wasn't just my stomach, or my usual food reaction or womanly cramping either. No, these cramps started just below my breasts, and traveled in waves down to my pelvis. This was the weirdest pain I have ever felt, with waves of pain traveling down my body every 5-10 seconds. I went downstairs and heated up my corn bag. I tried laying in different positions (lying on my right side seemed the least unbearable). I tried going to the bathroom, drinking water, stretching, everything I could think of. In the end, I just cried. And, yes, to answer my husband's favorite question, it helped! Ok...no, not really.

Finally, after an excruciating hour, I woke my husband up, and asked him to go downstairs and get the Pepto (didn't feel like I could make it down and up again). I took it, but was still really worried. My husband got online and did some googling. We figured, whatever was going on, most serious stomach problems seem to develop over a period of 12-24 hours. So, we went back to bed, and made plans to call the doctor in the morning. The Pepto finally kicked in, and I was able to sleep again.

I got up for work a couple hours later, and the pain seemed to be at bay. I was hesitant to go to the doctor if the pain hadn't returned, considering I had a busy day ahead of me. So I waited. I wondered if it had been food related, so I trashed everything I'd eaten the day before that was out of the ordinary for my diet.

The lack of sleep caught up to me mid-morning and threw me into a headache. Which wasn't helped by the fact that starting around lunchtime, everything edible sounded repulsive to me. So I had a hard time choking down food. Then in the afternoon, I started feeling some cramping/aching. Not as severe as the nighttime episode, but also unlike cramps that I normally experience.

And I've felt like that ever since. Any time I bend over, turn to the side, basically move my core in any way, I feel the pain. Also when I'm just sitting, I can feel the ache. And the nausea/selective appetite has been pretty bad. I still don't know what's going on, but I plan on calling the doctor tomorrow morning.

So anyway, back to that mouth-watering photo above. What does all of this have to do with me and my plans for a grain free diet? Well, one of the only things that has been remotely appealing the past few days has been Corn Chex cereal with homemade almond milk. I've been eating that for breakfast (and even a dinner or two).

I have had a hard time eating breakfast over the last few years, dealing with some nausea, which my doctor believes to be related to my hypoglycemia. I love breakfast foods, and I generally eat within an hour of getting up, but some days it's a struggle. That's what this week has been, only it's been pretty much the same story with every meal of the day. So finding appealing foods has been difficult, especially when trying to eliminate one of the staples in my life - gluten free grains.

Ever since Karina, everyone's favorite Gluten Free Goddess, posted this recipe on Tuesday, I haven't been able to get it out of my head. Up until today though, I've been so busy, and haven't even had time to think about baking. But I woke up this morning, and it was pouring rain. What did this mean? Baking!!

Yes, having a day cool enough to bake in June in Utah is not common. If I plan on baking something during the summer, normally I will do it at the very end of the day, when I can open the windows to cool the rest of the house.

Luckily, I had a few recipes that needed making this week!

So, I gave in and made the bread. It turned out to be pretty good. It is denser than a lot of breads, but it's hearty. I loved the tang of the olives in it (would probably double them next time), and it made for a great dipping bread. I had it for dinner with some tomato soup.

I substituted a couple of things - sorghum flour instead of brown rice, buckwheat instead of rice bran (I couldn't find anything online for a good sub for rice bran, so I just guessed).

I will keep you all up to date on my stomach issues. If anyone has any suggestions, please send them my way!

And if you feel like baking on a cool summer's eve, make this bread!
Thursday, May 26, 2011

Paleo Breakfast Pizza

I know I've mentioned my interest in following a paleo/primal lifestyle on this blog before. It's still an idea that frequently visits my mind. And occasionally I'll pick up and peruse my copy of The Primal Blueprint, which resides in the magazine pile in our bathroom. Mostly I've been too busy to try and change things up lately.

The other day, however, I stumbled across this great blog, and it renewed my interest in paleo/primal eating. The following evening, as I was driving home from a long day at work, doing a mental inventory of edible food in my fridge/pantry, I remembered I had all the ingredients to whip up this quick and easy breakfast pizza. I may have driven a little bit faster in my desire to give this recipe a try.


My version turned out really well! I overcooked my "crust" a bit, I think, but it was still delicious. I would also suggest adding bacon or ham, to give the pizza another dimension of flavor. I think this meal was a bit confusing to my taste buds, as I couldn't decide if it was more "breakfast-y" or more "pizza-ish." In my opinion, bacon would have married the two nicely, as it is a flavor that compliments both dishes.

This is definitely going to be a repeat recipe in my book.


Paleo Breakfast Pizza
Adapted from this recipe

8 eggs, whisked
1/2 tsp (ish) garlic powder
1/2 tsp onion powder
1 tbsp dried basil
A few shakes salt and pepper
1-2 tbsp olive oil
1/2 c marinara/pizza sauce
1/2 lb Italian ground sausage (I used basil chicken sausage)
add BACON here. Lots and lots of bacon!
2 medium tomatoes, sliced
1 c sliced black olives
2+ tbsp nutritional yeast or nooch-eez
Other toppings of your choice

Heat olive oil over medium high heat in a large skillet (my pan is cheap and sucks, so I coated it with pan spray, and added a little less oil).

Combine eggs and seasonings, mixing well. Pour mixture into skillet, cover, and turn heat down to medium. Cook for about 3 minutes. Eggs will be firm on the bottom. Do not stir!

After 3 minutes, remove the lid, and transfer the skillet to the oven. Turn on the broiler, and let broil for about 3 minutes, until the top firms up.

Remove from the oven, and spread the pizza sauce over the surface. Pile on the rest of the toppings, and sprinkle on the nooch.

Return pan to the oven, and broil for an additional 5 minutes.

Slice and serve immediately.


Note: Be sure and use an oven-safe skillet. I don't think mine was. The handle swelled a bit, and it started to smell a little funny in the kitchen.

Also, I don't know how many servings this makes, but I managed to eat half of it in one sitting. Oops ;)


I've shared this recipe over at Simply Sugar & Gluten Free, The Gluten Free Homemaker, and The WHOLE Gang. Check out some great carnivals, filled with amazing recipes!

Nooch-eez (Parmesan cheese sub)

Nooch-eez

Or as Gena calls it, Hemp-esan (but I couldn't remember what she termed it, when I was explaining it to a friend, so I came up with the name Nooch-eez). Whatever the name you call it, this high-protein, dairy free recipe totally rocks!

It's one of the easiest "recipes" I've ever made, and it's been one of the top 3 staples in my kitchen of late. I smother bread with it (pre-toasting) to enjoy with eggs for breakfast, I sprinkle it on my salads, soups and even pizza. I'm even considering shaking up my traditional kale chip recipe by adding some of this goodness before baking.

How do I make this, you ask? Well, I'll tell you...brace yourself. It's so simple!

Measure into your blender/food processor/coffee grinder (maybe?) equal amounts of nutritional yeast and shelled hemp seeds. I usually do 2-3 Tbsp at a time. I also like to add a splash of garlic powder and a pinch of salt. Then just blend away!

And there you have it.

To enjoy it on toast, simply spritz or drizzle your bread with some olive oil, then apply liberal pinches of the nooch-eez. Toast to desired crispiness in a toaster oven. It will sizzle and brown, but it is still very loose atop the bread, so handle with care.

Wednesday, May 04, 2011

What have you been eating lately?


I don't know if anyone really even cares...but I'm gonna share anyway :)

I know a lot of people go through phases of eating patterns. Some of it has to do with the seasons (soups in winter, salads in summer), some has to do with what's available at the store/in the garden. Some of it has to do with what's easy, fast, and/or good.

Even though I haven't been posting a lot of recipes, obviously I have been eating over the past few months. So I thought I'd share a bit of what's been entertaining my dinner plate lately.

I've been trying to eat a lot more fresh foods, ie, veggies. I've been planning a lot more meals around what leafy goodness will be highlighting the meal. It's been a challenge at times, but a lot of fun too. Makes my husband laugh when I come home and make a plateful of kale chips...but have no other ideas of what I'm going to eat for dinner.

Green smoothies have been more prevalent in my daily routine. I'm a big breakfast person, and need lots of fuel to get through the mornings, especially after hitting up the therapy. Most days I'll eat eggs and muffins, or toast w/ hazelnut butter awesomeness.

New love affair.

And yes, I have been known to sneak spoonfuls of this stuff. You might be surprised at the number of spoons lounging around my house right now. Unless you'd tried this butter. Then you'd understand.

After eating breakfast, I'll cram some berries/banana/orange/apple/avocado, almond milk, spinach and chia seeds into my Vita-Mix, liquefy, and pour it all into my favorite starbucks cup, just in time to dash out the door.

On the weekends, I've also indulged in smoothie experiments, such as the chocolate-almond smoothie (easy on the banana, add a handful or two of spinach). I have even got the hubs to drink a couple dreaded green smoothies (added some peanut butter to his). I'm trying to see just how much green stuff I can cram into a smoothie without making it taste like a salad :)

I've been experimenting lately with this great new sugar substitute: Stevia! Look at this fantastic haul that I won from Iris over at The Daily Dietribe!


I'm totally digging the vanilla liquid stevia! It's amazing in chia seed pudding! Which is something else I've been eating a lot of lately. Chia seeds. I love 'em! In smoothies, in puddings, added to hot cereal. More to come on chia seeds...

This chocolate chia pudding recipe has been a staple for me lately. It's soooo good! I was recently given some cacao powder, which I'm enjoying, and have been adding it to this pudding in place of cocoa.


Mayan superfood! Yay!

I also love making the chia seed pudding cacao-free, and adding extra vanilla. Topped with some buckwheaties and berries - trust me, it's the perfect afternoon delight!

Also been eating my favorite staples: avocados, kale (new favorite: kale salad - shred up some kale, drizzle with EVOO, sprinkle w/ S&P, then "massage" everything into the kale for a couple minutes), my favorite GF bread, quinoa, and sweet potatoes.

So, that's about it. I'd love to hear what everyone else is eating!

Monday, October 11, 2010

Savory Veggie Quiche


This is an awesome recipe! I love the tang of tomatoes in every bite, and it's super healthy. I mostly followed the recipe in The Almond Flour Cookbook by Elana Amsterdam, but made a few adjustments to suit my tastes.

Like she says in the book, this dish is great for breakfast, lunch or dinner! Or all of the above, which is how I ate it when I first made it :D


Savory Veggie Quiche
GF/can be DF
(Adapted from The Almond Flour Cookbook by Elana Amsterdam)

Serves 6

2 tbsp grapeseed oil
2 c thinly sliced mushrooms*
1 c chopped spinach*
1 clove garlic, finely chopped
1 tbsp onion powder (original recipe calls for 1 med onion; if using, saute this first until soft, before adding mushrooms)
1/3 c sun-dried tomatoes in oil (or you can use 1/4 c dry packed)
3 large eggs, whisked
4 oz white cheese substitute (I've used fake mozzarella, as well as the real thing. Recipe calls for goat cheese)
1/2 tsp salt
1 savory pie crust, prebaked** (P.S. I have made this recipe before w/out the crust, and it's still as good. The crust does give a little extra texture though)
4-6 slices cooked bacon/turkey bacon, chopped*

Heat the oil in a large pan over medium heat. Saute the mushrooms for a few minutes, then add the spinach, garlic, onion powder and tomatoes. Saute for about 10 minutes (give or take; if using dry tomatoes, you probably want to cook a few extra minutes. The original recipe sautes for 15 min).

Preheat oven to 350 degrees F. Combine eggs, cheese and salt in a large bowl. Add all the veggies, and stir. Pour mixture into pie crust. Sprinkle bacon on top.

Bake in preheated oven for 30-35 minutes. Quiche should be browned a bit and cooked through. Let it cool on the counter for half an hour or until you can't stand it. Then serve it up!


*Notes: Elana's recipe uses 2 c broccoli and 1 c mushrooms, but I don't eat broccoli, so I upped the 'shrooms and added some spinach (I've used both fresh and frozen and both are good).

Also, the original recipe doesn't use any bacon, but when I made this the first time, I felt like it was missing something savory and meaty, so the next time I made it, I added some chopped bacon. Make sure you add it to the top of the dish, otherwise it gets lost in the multitude of flavors.

**Savory Pie Crust Recipe (also adapted from The Almond Flour Cookbook)

1 1/2 c blanched almond flour
1/2 tsp sea salt
1/2 tsp baking soda
1/2 tsp (or so) onion powder
1/4 c grapeseed oil
1 tbsp water

Preheat oven to 350 degrees F. Combine flour, salt, soda and onion powder in a bowl. In the center of the mixture, whisk together the oil and water. Incorporate the wet and dry ingredients. Press dough into a 9-inch (ish) pie pan.

Bake for 12-15 minutes. Crust is ready when golden brown. Remove from oven and cool before filling.


P.S. Forgot to mention, this recipe is just one of many delicious dishes you'll find at Linda's Gluten Free Wednesdays! Head on over and join the party!

Sunday, May 30, 2010

Breakfast Bake

This recipe rocks! Wanna know why? Because it’s gluten free AND dairy free! And you don’t miss either!!!

My mom made something similar to this for holidays like Easter and Christmas breakfasts. We loved it. The original recipe here didn’t use mushrooms soup, just milk, but I think my mom used cream of mushroom soup in her version. So I played around with it, and it totally worked! The first time I made it, I didn’t use the mushroom soup, and it was still really good. So, whatever you prefer and have on hand will work I’m sure.

I’m not such a morning person, and don’t really function without my food in the AM. When I’ve made this, I have set my alarm for about an hour before I need to get up, and I’ll throw this in the oven, then go back to bed. It’s a nice counter to having to get up for work to awaken to the smell of bacon and eggs already made and waiting for you!


Gluten/Dairy Free Breakfast Bake
(adapted from this recipe)

3 cups bread pieces, cubed or ripped*
10 pieces fried and chopped bacon (turkey bacon works pretty good here)
8 eggs (I used half eggs and half egg-whites – the kind that come in a carton)
¾ c fresh unsweetened almond milk/other substitute (recipe here)
¾ c cream of mushroom soup (recipe here)
½ tsp salt
1/3 tsp onion powder
¼ tsp black powder

Grease a glass baking dish/pan. Lightly beat eggs in a large bowl. Add milk and soup, and blend. Whisk in the seasonings, then the bacon. Cover the bottom of the pan with the bread pieces, then pour the egg mixture on top.
Cover pan with foil and refrigerate overnight. When ready to bake, preheat oven to 350 degrees F. Put covered pan in oven, and bake for an hour. Uncover, and bake for 15 minutes more.
Let cool a few minutes before serving.
Serves 8
(although the last couple days, I've been working out and have been eating more. I might reduce this to 5-6 servings if you're a big breakfast eater)


* I’ve tried this recipe twice, and the first time I used this recipe for almond flour bread. The almond bread was great in this, and added extra protein. The second time I made it, I used this great recipe for bread-for-bread-cubes that I will traditionally use for my stuffing. I think the almond bread was a little heartier, but the sorghum bread was lighter, and melted a little more into the recipe, making it creamier (or else that was the use of the mushroom soup). I am more likely to have a sorghum-based bread on hand, so that’s the one I think I will use most. You could also try one of these great bread recipes. I bet it would be fabulous with a gluten free French bread!

Saturday, May 29, 2010

Pumpkin Chai Cranberry Muffins

I know we’re well on our way to summer, and this is more of an autumn/winter recipe. But silly me, I’ve neglected posting it for you all. I literally ate these muffins daily last fall. They are so delicious! Give them a try when you’re in the mood for something wonderfully moist, slightly spicy and reminiscent of a thanksgiving feast. And don’t put off making them for a year like I did! You’ll regret it if you do!

This was originally a bread recipe, but the first time I went to make it, I was too impatient to want to wait for bread to bake, so I converted it to muffins. It makes between 15-18 muffins. I've tried it as a bread, and for some reason, it just wasn't as good. So I definitely recommend the muffin version!
Sadly, I do not have a picture for these, but visit Karina’s post to get a great visual!

Pumpkin Chai Muffins with Cranberries
(adapted from this recipe by the GF goddess)

1 c canned pumpkin
½ c light olive oil
3/4-1 c light brown sugar or ½-2/3 c agave nectar
2 tsp vanilla extract
2 eggs, at room temperature
1/3-1/2 c apple cider or orange juice
1 ½ c gluten free flour blend (equal parts buckwheat/sorghum/tapioca work great!)
1 tsp baking soda
1 ½ tsp baking powder
½ tsp salt
1 tsp xanthan gum
1 tsp ground cinnamon
½ tsp ground allspice or cardamom
½ tsp ground ginger
½ tsp ground cloves or more ginger

Add-ins
¾ c fresh/frozen cranberries
½ c raisins
½ c chopped pecans/walnuts/almonds
½ c chocolate chips

Preheat oven to 350 degrees F.
Grease or line muffin cups.
Combine wet ingredients. On top of that, pour in the dry ingredients. Mix the dry ingredients together, then stir into the wet ingredients. Mix until smooth. Use extra liquid or flour to thicken or moisten if needed.
Stir in your add-ins. I preferred mine with the cranberries, nuts and sometimes with chocolate.
Scoop batter into muffin cups, and bake for about 30 minutes. Test with a toothpick or knife.
Remove from muffin pan, and cool on a wire rack.

Best served warm.
These freeze very well.

Quick note: I've found, in general that Karina's recipes are a little more sugary than I like, being hypoglycemic, and needing something somewhat hearty for breakfast. I started with the smaller suggested amount of sugar, and thought they turned out great. But if you like your muffins a bit sweeter, feel free to add the full amount.
I've also had great success subbing applesauce for half of the oil. Try that sometime, it's great and good for you!

Monday, March 22, 2010

Healthy Green Smoothie

Don't judge the picture. I know it doesn't LOOK yummy, but it is :)

I found this recipe over at Winnie's blog, Healthy Green Kitchen.

I love my Vita-mix and am always looking for new ways to use it! This one intrigued me, as it uses two of my favorite green foods: avocados and kale. The combination doesn't sound that amazing, but it is actually pretty good. In the past, I've made fruit smoothies with a few handfuls of spinach, which I totally love (and you REALLY can't taste the spinach, for real!).
So I gave it a go.

I love this recipe! I've tried it with a few variations. I've added a bit of sugar/agave. I've added some pineapple juice. I've added almond milk. I like 'em all.

Just experiment, and see what works for you. This will make 2-3 servings, but it's better fresher, so half the recipe if you wish.

Green Smoothie
1/2 in. piece of ginger, peeled
1/4 slice of lemon
A splash of water
1-2 apples, cored (I've also used applesauce and it works just as good)
5 stalks of kale, stems removed
1 avocado, peeled and pitted
A pinch of sea salt
1/4-1/2 c almond milk or water
Optional: a bit of sweetener, fresh pineapple

Combine the ginger, lemon and water in the blender. Process for about a minute. Pour through a fine mesh sieve into a glass, pressing on the solids.
Rinse blender, and pour the ginger liquid back in. Add remaining ingredients (go slow with the milk), and blend for 1-2 minutes, until completely smooth. Add more liquid as needed. Taste to see if it needs more of anything.
Serve and enjoy!

Don't you feel so healthy?

This post is linked to Slightly Indulgent Tuesday!

Friday, February 12, 2010

Chocolate Chip Scones and Almond Milk


This is my new favorite snack/dessert! Chocolate chip scones and homemade almond milk.

The scones recipe I got from Elana's new cookbook, "The Gluten Free Almond Flour Cookbook." I reduced the amount of chocolate from 1 cup, and the original recipe calls for chopped dark chocolate, but enjoy life chocolate chips worked great!

Chocolate Chip Scones
2 ½ c blanched almond flour
½ tsp salt
½ tsp baking soda
1/3 c olive oil
¼ c agave nectar
2 large eggs
¾ c chocolate chips
Preheat oven to 350 degrees. Whisk together wet ingredients. Mix in dry ingredients. Fold in chocolate chips. Scoop out onto parchment lined baking sheets, 2 inches apart (8 per sheet). Bake for about 13 minutes, until golden brown. Let cool on baking sheets for half an hour. Serve. Makes 16 scones.

These are great reheated from the freezer. I like to microwave them until just barely warm, then throw them in the toaster oven for a minute or two to firm up again.
I love the flavor of these scones. To me, there is even a hint of a coconutty flavor...probably from the almonds. I love it!


On to the almond milk....

I've been dairy free (mostly) for 2 1/2 years. I haven't had a drink of milk in that entire time. Usually I'm okay with that. But once in awhile, I get the craving to just chug a glass of ice cold milk. Substitute milk products just never wowed me. I'd drink some chocolate soy milk occasionally, and buy whatever's on sale (usually almond breeze) when I needed something to use in cooking/baking.
This recipe is really simple. I've made it several times in the past few weeks, and I love it. To me, it's not exactly milk, but it's definitely a close substitute. I feel like the texture is the same, and when you take a drink, it feels milk-like in your mouth. The almond aftertaste is what throws it off. It isn't bad, but for those looking for a REAL milk-like substitute, this may not wow them. I was pretty impressed though!
The greatest part is, it's healthy, doesn't have any weird additives, and it's cheaper than buying the stuff at the store. I stock up on my almonds when they're $3-$4 a pound at the HFS. 1 pound equals about 2 cups of almonds....which equals about 2 quarts of almond milk. For $3-$4!! That's about what I pay at the store for ONE quart of almond milk. Plus, I feel like the stuff at the store is a bit thinned out. I like how rich the homemade stuff is.

Anyway, enough trying to sell you on the idea :) Try it out for yourself. Then you'll see what I'm talking about! Visit Amy at Simply Sugar & Gluten Free for more info. She's the one who turned me on to this amazing discovery!

Homemade Almond Milk
1/2 c almonds
Enough water to cover (for soaking)
2 cups water
Optional: salt, vanilla and choice of sweetener (I haven't tried adding anything to my milk. I've enjoyed it the way it is).

Put the almonds in a glass jar or bowl. Cover with water, then cover bowl. Soak overnight (or for a few hrs) at room temperature.
Drain water, rinse almonds well.
Pour 2 cups of water into a blender. Add almonds. Blend on high for 2 minutes. Pour through a cheesecloth-lined fine mesh sieve (I did this in portions. I would pour probably 1/2 c liquid in, then let it drip a bit, then gather the cheesecloth together and gently squeeze until all the liquid's out. I then scooped out the almond grinds and threw them in a ziploc bag. Still haven't figured out what to do with them. Then I rinsed the cheesecloth, and relined the strainer).
Keep refrigerated and covered. Lasts about a week. If you don't drink it sooner!!

Enjoy!

Wednesday, January 06, 2010

Cinnamon Roll Muffins


This post is soooooo long overdue! These are what I ate on Christmas morning, and I was so excited to share them with all my blogging friends...yet, here we are, weeks later, and I'm just getting to it. :(

Anyway, this recipe is great! Found it on Elana's amazing site (got her cookbook for Christmas by the way, and I LOVE it!!). Tweaked a couple things based on what I had in the house.

Cinnamon Roll Muffins
Original recipe here

Muffin Ingredients
1 c blanched almond flour
2 tbsp sorghum flour
1/2 tsp baking soda
1/4 c salt
1/4 c olive oil
1/4 c agave nectar
3 eggs
1 tbsp vanilla extract

Topping Ingredients
2 tbsp sugar (approx.)
1 tbsp cinnamon
1 tbsp olive oil

Make muffins: Preheat oven to 350 degrees F. Line muffin tins w/ cups. Mix together wet ingredients. Add in dry ingredients, and blend well. Scoop 1/4 c mix into each cup (Elana's directions state this, and I added more to each muffin, but they ended up being a little thick, so I recommend this as well).
Make topping: Mix together all ingredients in a small bowl.
Scoop topping onto muffins.
Bake for 8-12 minutes.
Cool, then serve.
(I can't remember how many this made, but I'm assuming if you only put 1/4 c in each tin, you get at least a dozen)

The directions recommend topping the muffins w/ cream cheese frosting, and I'm sure to experience the full cinnamon roll effect, you would need to do this. However, I loved these just the way they were, with a nice hot cup of tea.

Enjoy, and a happy new year to all!

Friday, April 03, 2009

Banana Chocolate Chip Muffins

Yes, I've been on a roll tonight. It's been awhile since I posted new recipes, and then BAM! Overload. Sorry about that. Been a bit preoccupied.
I worked almost 100 hours this pay period. I've been catching up on several weeks worth of Heroes, House and Dollhouse. I've been emerged in the sixth Harry Potter book, which I'm listening to again. I've been pretending to take care of the house. And I've been trying to figure out what's wrong with what I'm eating these days. I've been busy.
I think I figured it out! The latest culprit in my stomach's attempted murder mystery. ONIONS! I made this huge batch of veggie stock a couple weeks ago, and used it to make several fabulous soup/stew recipes (which I shall post soon).
No matter which of these great recipes I ate, I was very sick! Frustratingly so. So I ate every ingredient I could think of that was common in the recipes, sort of a reverse elimination diet...and came to the conclusion that it is probably the onions. I've never really been a huge onion eater, per se, but I do enjoy the flavor. So, we'll give onion powder a try in a couple weeks, see if that will be an adequate substitute.
But, I've deviated from my original subject. These delectable creations!


They are divine! Again, I must praise Karina! Although, I do rather enjoy her photos of the "jumbo" muffins. I don't have a jumbo muffin pan. I think these are still pretty good, for being regular-sized.
Original recipe here.

Banana Chocolate Chip Muffins
Makes about 1 dozen

3 ripe bananas, peeled and mashed (I used 2 bananas + about 1/4 c applesauce)
1/4 c light olive oil
1 c light brown sugar (I actually only used 1/2 cup)
2 tsp vanilla extract (make sure it's gluten free!)
1 egg
1/2 c sorghum flour
1 c Featherlight flour mix*
1 tsp baking soda
2 tsp baking powder
1/4 tsp salt
1 1/2 tsp xanthan gum
1 tsp cinnamon
1/4 tsp nutmeg
1/2 c mini chocolate chips (Enjoy Life brand are great for those avoiding dairy), or 1/2 c chopped nuts, or 1/2 c dried fruit

Combine wet ingredients in a large bowl. Make sure there are no big banana chunks (that's really gross if you get a bite of that!). Mix dry ingredients together in a separate bowl. Add dry ingredients to the wet ones. Beat until smooth. Add a couple tbsp of milk/non-milk substitute if needed. Add the chocolate chips/nuts/fruit.
Preheat oven to 375 degrees F. Spoon into greased or lined muffin cups. Bake for 15-20 minutes. Use a toothpick or a butter knife to check (should come out clean).
Cool muffins for a few minutes in the pan, then transfer to a wire rack.
Best served warm. Can be easily reheated in the microwave (and throw in the toaster oven for a minute afterward if you like).

The banana flavor in these was not overwhelming, like you get in banana bread. It may have been the chocolate. Whatever it was, they were moist, flavorful, and delicious!
Next time, I might decrease the chocolate chips to about 1/3 cup, and add some finely chopped pecans (enough to make up the difference to 1/2 cup). Or maybe mix dried cranberries and chocolate chips...mmm! These were good, but not too dessert-ish. I would recommend halving the sugar like I did if you want them for a breakfast. They were on the verge of being too sugary for me. But not quite ;)
Now, if you want a dessert muffin/cupcake, try these. They taste pretty similar.

Sunday, January 18, 2009

Blackberry Muffins with Streusel Topping


These muffins are simply delectable. I found fresh blackberries on sale at the health food store the other day, and bought up a few. I made some muffins a couple summers ago with fresh blackberries, and remember loving them, but couldn't remember what recipe I had used. So, I rummaged through all my cookbooks and came up with this one. It's from my new favorite "1000 Gluten Free Recipes" by Carol Fenster, and the original recipe calls for raspberries and lemon zest. I subbed the blackberries in, and used lemon juice instead of zest (since I didn't have any lemons).
I brought these in to share w/ everyone at work, and the girls asked me for the recipe. Now I have to figure out how it would be converted to a gluten-full recipe :P


Blackberry Muffins w/ Streusel Topping

2 large eggs, at room temp
1/2 c milk
1/3 c canola oil (I just used applesauce)
2 tsp grated lemon zest (I used lemon juice)
1 tsp vanilla extract
1 1/2 c sorghum flour blend*
1/4 c tapioca starch or sorghum flour blend (I used almond meal instead to give texture)
3/4 c packed brown sugar (I didn't have any brown, so used white sugar instead)
1 tbsp baking powder
1 1/2 tsp xanthan gum
1 tsp cinnamon
1 tsp salt
1 c (6 oz) fresh blackberries, rinsed and patted dry

Streusel Topping:
1/4 c sorghum flour blend*
1/4 c GF cereal (the recipe suggests Perky's nutty flax/rice cereals, which are a lot like grapenuts, and I like, but I only had rice chex on hand, so I crushed that up and used instead)
1/4 c packed brown sugar (again, I used white, as I was out of brown)
1/4 tsp cinnamon
1/8 tsp salt
1/8 c (1/4 stick) unsalted butter/buttery spread (I used Earth Balance)

To make muffins:
Place a rack in the middle of the oven, preheat to 375 F. Grease or line a 12-cup muffin pan.
In a medium bowl, beat the eggs. Add the milk, oil, lemon, and vanilla, and beat until batter is smooth and thickened slightly.
In a small bowl, whisk together the dry ingredients, except the berries. Gradually mix the dry ingredients into the wet ingredients, until batter is smooth. Gently stir in the berries. I left my berries whole, but I really like having some berry in every bite, so next time, I might cut my berries in half (they were really big). Spoon batter into muffin tins. Sprinkle 1/2 tbsp streusel topping onto each muffin, and press into batter gently.
Bake for 20-25 minutes or until muffin tops are firm. Cool in the pan for 10 minutes. Transfer to a wire rack to finish cooling. Best when served warm. Reheat wonderfully in the microwave or toaster oven.

To make the topping:
In a medium bowl, mix together the first five ingredients until blended. Cut in the butter, and using your fingers, blend until well mixed and butter is in pea-sized pieces.

*Sorghum flour blend
1 1/2 c sorghum flour
1 1/2 c potato starch/cornstarch
1 c tapioca flour

Makes 12-15 muffins, depending on size (the picture below is of mini-muffins).

Friday, January 02, 2009

Gluten and Dairy Free Apple Cinnamon Muffins


These rock! I found the recipe on Karina's site.

I made the recipe mostly the same, just reduced the oil to 1/4 c (and used EVOO rather than light), and I used Martinelli's sparkling apple cider in place of apple juice (Luke drank it for dinner before I could claim it). The buckwheat was not very noticeable to me. They tasted similar to what I remember of a bran muffin, but lighter and airier. I was very tired last night when I pulled out the last batch, so I put some of them away when not completely cooled >< They were a bit soggy this morning, but 15 seconds in the microwave, followed by 3-4 minutes in the toaster oven, and they were good as new!

Gluten/Dairy Free Apple Cinnamon Muffins

1 cup applesauce
1/3 cup olive oil
1 cup brown sugar
2 tsp vanilla
Egg replacer for 2 large eggs
4 tbsp apple juice (or sparkling cider)
3/4 cup buckwheat flour
1/2 cup sorghum flour
1/4 cup tapioca starch
1 1/2 tsp baking powder
1 tsp baking soda
1/2 tsp salt
1 tsp xanthan gum
1 tsp cinnamon
1/2 tsp allspice
2 tbsp Acacia fiber (optional)
1 1/2 cups chopped apples
1/2 c chopped walnuts

Preheat oven to 350F.
Beat wet ingredients plus sugar together in a mixing bowl.
Pour dry ingredients on top of wet, then mix until well combined.
Stir in apples and nuts.
Spoon into greased/lined muffin cups
Bake for 20-25 minutes (mine needed 24 minutes), until firm and dark golden. Test w/ a knife to see if done.
Remove from pan, and cool on a wire rack.

The original recipe says this makes 12 muffins. I didn't know how full to fill the pan, so I ended up getting 18 muffins out of this. It might help if I had a full 12-cup muffin pan...

Enjoy!!!